Tag Archives: Medallion Improv!

Presentations in 2017

I still have openings for presentations and workshops in 2017. And it’s not too early to book for 2018! I’m located in east central Iowa and can travel.

Contact me at catbirdquilts @ gmail.com for more information or to schedule guild presentations or classes.

LECTURES OR PRESENTATIONS

adjusted

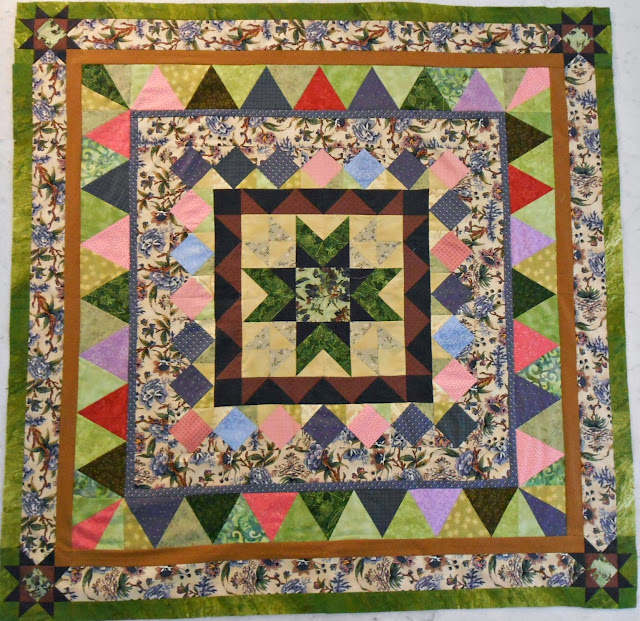
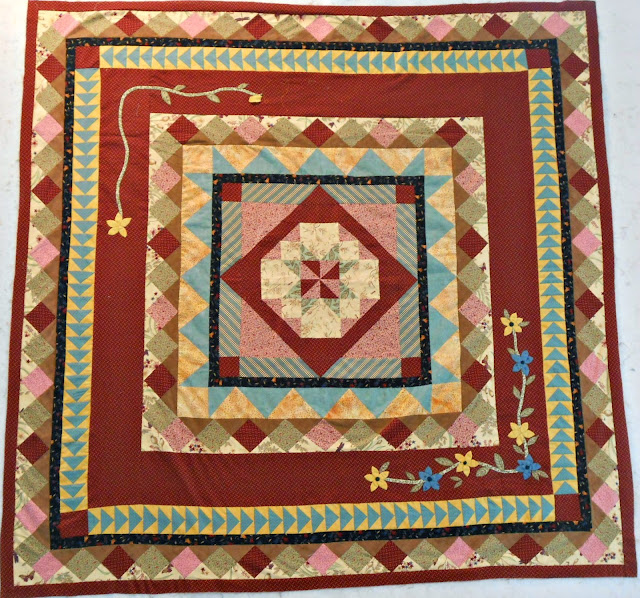
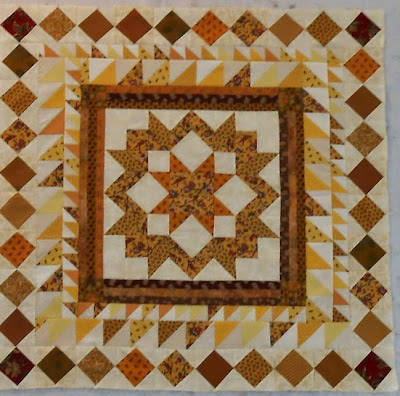
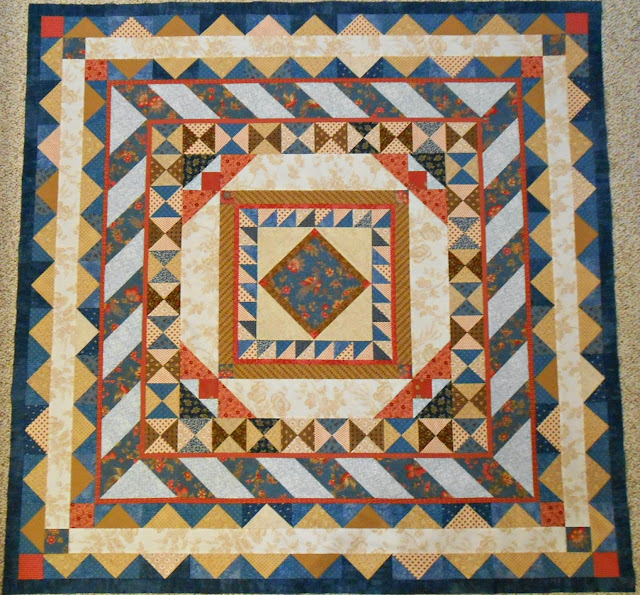
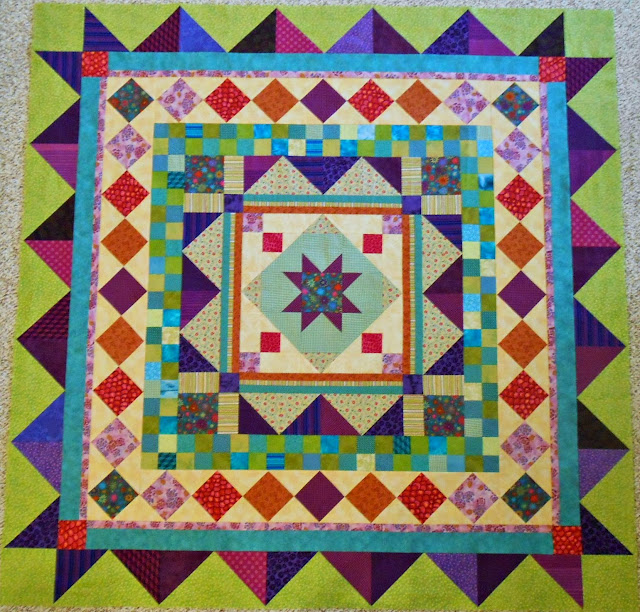
Medallion Quilts Design Basics

What challenges do medallion quilts present? Learn the basics of medallion quilt design principles, including unity, symmetry, balance, proportion, and movement. Find out how to achieve these with color, value, shape and size, line, and placement. Mixed presentation including PowerPoint slides and trunk show. Approximately 1 hour.

The Underground Railroad Quilt Code: History, Mystery, or Bunk?

Were quilts used to help slaves escape? What codes might have been used to convey information to fugitive slaves? What was the legal, economic, and political environment during the Underground Railroad years? This class looks at pre-Civil War history and existing evidence on the quilt code. Approximately 1 hour.

The Mill Girls, Revolutionaries in America

Who were the Mill Girls and where did they come from? What part did they play in changing America forever? How did the textile industry in which they worked propel slavery in the U.S.?  Learn the fascinating stories about how these girls and young women drove the industrial revolution in America,  led the labor and women’s rights movements, and helped bring quilters to where we are today. Approximately 1 hour.

Collaborative Quilting and Round Robins

Most of us collaborate in our quilting, using patterns designed by others or creating with partners. Round robins are group projects that pass through the hands of a number of quilters. Round robins are fun and challenging, stretching quilters’ creative powers. Learn about the joys and challenges of collaborative quilting, including sample rules for round robins. Approximately 1 hour.

CLASSES and WORKSHOPS

Untitled
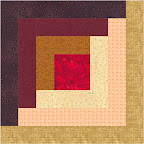
Having Fun with Economy Blocks

Learn to make Economy blocks the size you want for a setting you love. Using them alone, you can create fun and stunning scrap quilts. Brainstorm other ways to use these versatile blocks and begin to see the possibilities. You’ll learn how alternate blocks can create a sparkling secondary design. You’ll see other settings such as in borders, medallion centers, or as the beginning of a great modern quilt. This one-day workshop is fun for quilters of all skill levels.

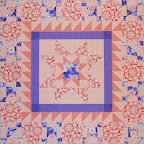
Medallions for Beginning Quilters

Can you measure and cut accurately and sew a pretty good 1/4″ seam? Have you noticed all the modern medallion quilts around and want to get in on the fun? Or maybe you love the history and beauty of traditional medallions. Join me to learn some basic medallion techniques. You’ll improve your 1/4″ seam, chain-piece, press, and construct five basic blocks. We’ll cover multiple methods to make half-square triangles and flying geese, so you can choose what works best for you. With blocks in hand you’ll assemble them into a medallion quilt top. This 5-session class is for confident beginners.
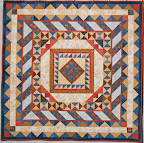
Medallion Improv!

This Design-As-You-Go class will show you strategies and techniques to customize a medallion quilt. Whether you love modern style, traditional, or somewhere in between, your imagination and favorite fabrics will create a quilt unique to you! You’ll learn how to create a center block to serve as your focal point and inspiration; choose and size borders to enhance the center block and each other; and lots of tricks for dealing with color, shape, value, balance, and unity. This 5-session class is for the experienced quilter who isn’t afraid to design her own quilts or change patterns to suit her own vision. Class size is limited due to extensive discussion time needed.

Contact me at catbirdquilts @ gmail.com for more information or to schedule guild presentations or classes.

The Housework Fairy Is Done (Even if the Housework Is Not)

In April and May I taught my Medallion Improv! class at one of my favorite local shops, Inspirations in Hills, IA. The purpose of the class is to teach students to create medallion quilts of their own design. I provide a “template” for them to use if they choose, which helps with border and block sizes. In addition they each get a workbook I wrote with design information and ideas, as well as construction pointers.

One of the main features of the class is the “workshop,” or providing feedback to each other on our work so far. We each show what we’ve done and discuss our thinking, as well as possibilities for changes and additions. The other members of the group give ideas and comparisons. The comments help eliminate some options and expand others.

To help them visualize different solutions to the many challenges medallions can offer, I make two quilts that are very different from each other. Recently I finished the second one and now have pictures of it.

20150620_105354

I Found the Housework Fairy But She’s Not Coming Back. 35″ square. Finished June 2015. Photo by Jim Ruebush.

I began this quilt with a piece of fabric. Last fall when Jim and I visited Taos, NM, I purchased a half-yard of Alexander Henry fabric. On one side of the width was one fairy, and on the other side were two grouped together. For this quilt I chose the side with only one. To fit the center block size of the template, I cut it to a 15″ finish. After cutting, I decided I wanted to use curved insets. The insets frame the fairy with lines that continue across the block, allowing easier focus on the fairy herself. Of course, adding the insets messed substantially with the sizing, and I was lucky to get it back to 15″ finish. Lesson learned: add insets before cutting to size.

The first border is 2.5″ wide. It is very simple, again intended to draw attention to the fairy. The avocado green and turquoise strips are mitered to draw lines directly to her.

The next border stumped me, but here the class helped. Using a large design wall, I auditioned a number of fabrics and ideas. Phyllis asserted that the pale fabric was my best option for next color. But at home I tried various solutions and still wasn’t convinced. Finally I told myself to think like my sister Cathie. Her approach is somewhat different from mine, and she gets great results. If I could be more flexible in my thinking I could meet this challenge.

I decided to put squares on point, but make them smaller than the width allowed. That meant more squares and a little more delicate feel. But I needed to figure out how to fill the width. I chose having a darker color outside and extra of the very light color next to the center. Also because all the squares and their setting pieces are on the bias, a strip of lavender on the outside edge stabilizes it and gives it a more defined finish. I tried a variety of corner blocks before choosing the multi-colored batik.

The third border is 3.5″ wide, taking the top to 35″ finished. I like the plus blocks. The floated setting shows off each block and also provides an airier feel than would be achieved if the blocks were set against each other. I’ve described my decisions for that border pretty completely here, so won’t repeat all of it.

My class blueprint takes the quilt to a 60″ square. Once I finished the third border, I tried two completely different approaches to the fourth one. Neither worked, and after each attempt I liked the piece better by stopping where it was. So I did.

The final challenge was quilting. The density of the print design in the center still threatened to obscure the fairy. To emphasize her I wanted to hand-quilt around her, rather than quilting right across. I used a small posy edge-to-edge design, with free motion quilting, avoiding her. After the rest of the quilting was done, I did the hand-quilting.

20150620_105521

The center with the insets. Quilting isn’t very visible, but perhaps you can see I didn’t obscure her with machine quilting through her.

The binding is the same fabric inset at the bottom of the center block. I’d made it for a different project, but it didn’t work for that one. Fortunately it is just right for this.

The class was wonderfully successful. I had the pleasure yesterday of seeing two of my students’ projects and they are wonderful, startlingly different from each other, and so suited to their makers. My other project for class, Marquetry, was documented here.

adjusted

Marquetry. 87″ square. Finished May 2015. Photo by Jim Ruebush.

Thank you as always for stopping by. I always welcome your comments and questions. If you are making your own medallion and have questions, please feel free to ask.

Medallion Improv! Class Projects

Yesterday was our final class meeting. In five sessions over four weeks, my talented students produced some wonderful work. They are all experienced quilters, which made the task simpler for me. As I’d hoped, they were generous with sharing their own process and problems AND solutions, as well as constructive comments and ideas for the others.

Each of the students created a unique, design-as-you-go medallion. They all used a template for border widths, which I provided. Even with that limitation, their projects are strikingly different.

Here are some photos of their medallion quilt tops. Most are completed, and a couple are nearly done. We hope to get together as a group later in the year, when all the projects are quilted and bound. In alphabetical order:

Barb’s completed top. The print in two borders was her inspiration fabric, and she used it well to find more colors. I called it “Where the Garden Meets the Woods.”

Karen A’s top, needs one more border. She began with the small panel with the grand piano. We were all delighted with the way she introduced more colors. The final border will have accents of the blue and green to extend them farther out.

Karen M’s nearly-completed top. She has applique flowers to add in the upper left, similar to lower right. Her fabrics came out of an abandoned project, with a couple of new additions. I love the tiny flying geese, and her repeated squares-on-point borders.

Robin wasn’t able to join us Thursday, but she emailed this photo. She has two more borders to do in her almost-all-yellows quilt.

Here’s a bigger view so you can see Robin’s inner sawtooth borders. Note how she used two sizes and wrapped them differently. LOVE this effect!

Sarah made another top I’ll show you below, so this one is a wall-hanging, and as large as she’ll make it. Note the diagonal piecing around the center block, which gives an effect of block set on point.

This is my traditional take, as you may have seen it before. I’ll use a double-pink binding to echo the lines of double-pink in the center.

This is My Bright Idea. I’ll have more to say about process for both of mine, once they are quilted.

And because this is so spectacular, I also want to show off Sarah’s other medallion. She came to the class at least partly to move along this wonderful project. It is a family tree she created — her own design — for her grandmother. The economy blocks around the outside will serve as signature blocks for family members.

She’ll bind it with the same rosy red you see around the tree. This is a picture of love.