Working in Series #3

Besides giving an artist the chance to study and practice a specific style, technique, or theme, or to develop a narrative across a number of works, working in series is a great way for an artist to develop their own voice.

An artist’s “voice” refers to their distinctive and recognizable style, a visual language that sets them apart. It encompasses unique choices in technique, subject matter, color, or composition that consistently characterize their work. This cohesive and individual expression becomes a signature, allowing viewers to identify and connect with the artist’s creations, fostering a sense of continuity and recognition across their portfolio.

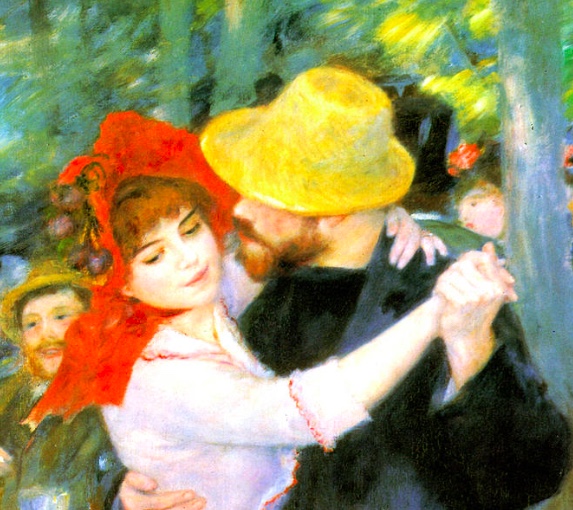
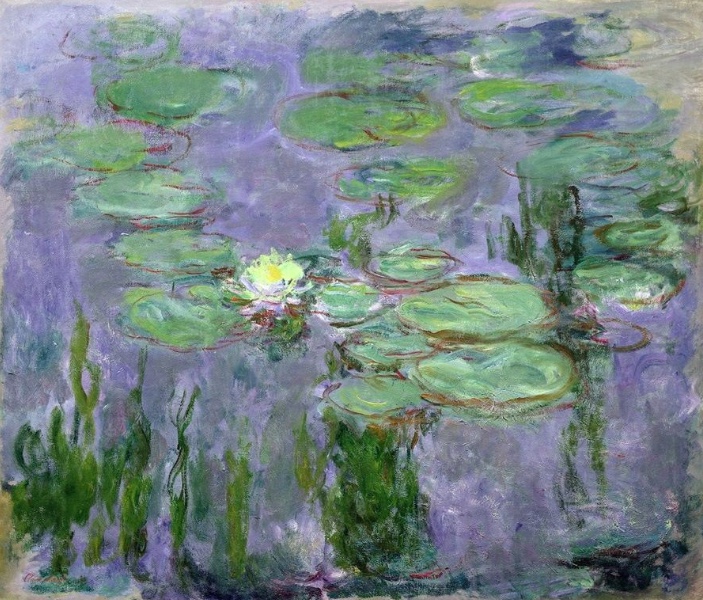
During the late 19th and early 20th centuries, a number of painters worked within the style of Impressionism. However, Renoir’s work is recognizably different from Monet’s. We often comment on Monet’s use of light and the loose brush strokes that allowed him to capture it, while Renoir is known for his romantic approach and the focus on relationships between people. Each had a recognizable “voice” for which they are still known today.
You can imitate other people’s style and have a successful quilt. Using someone else’s pattern and color scheme, or taking a class to learn a specific aspect of design, both contribute to our skills. When I took Jean Impey’s class last year, I learned how to create portrait quilts in her style. (My two quilts from her class below.) Impey’s series of portraits have allowed her to develop her unique voice as an artist. I’m glad I took the class because it was fun and I also learned technique and some new ways of thinking. I like the quilts I made, but her style is not mine, and it does not express me. It is not my voice.

So how do you go about developing that voice? For many people, it will start with imitation of others’ work. Consider what themes, subjects, or styles resonate with you on a deep level. What exactly is it that draws you to it? What makes you think, “I’d like to be able to create like this!”?

For example, if you’re entranced by Indian kantha quilts, study them. Look at the color combinations, the stitching, the layering. Which parts of that do you want to imitate, and which parts would you alter to suit your own preferences more closely? Then don’t just imitate; experiment. Experiment with approaches to discover what feels most authentic and expressive to you. Every change you make is an expression of you. By understanding your unique perspective, you lay the foundation for cultivating a distinct artistic voice that reflects who you are as an individual.

If you’re looking for a starting point, consider what styles or artists always make you pause. The works of Anna Williams, Yvonne Porcella, and Mary Lou Weidman all exhibit different styles of exuberant expression, but all are recognizable. Or maybe you prefer the structure and precision of Michael James or Victoria Findlay Wolfe. Perhaps you want to go a different way with an improvised look and feel.

Here are a few ideas for how to start a series of works to develop your own voice:

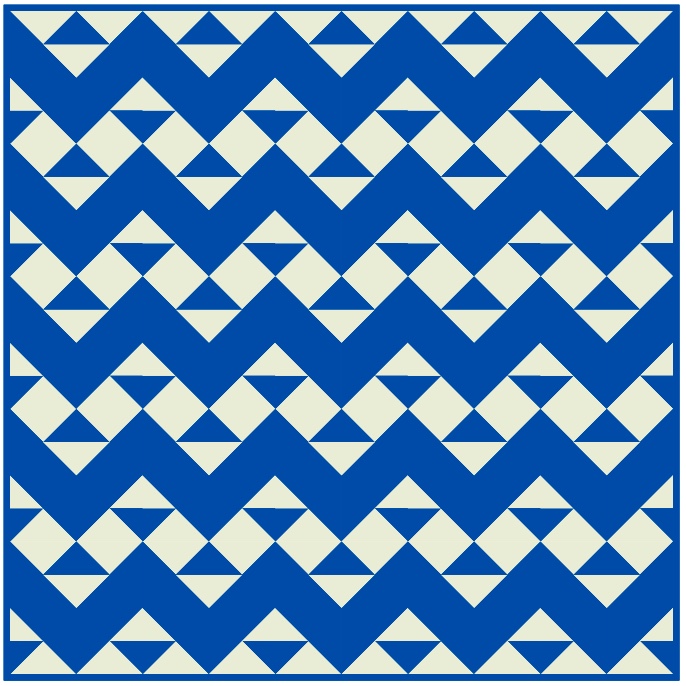
Color Palette Exploration: Create a series of quilts that focus on exploring and experimenting with a specific color palette. This could involve variations in shades, tones, and combinations to evoke different moods and emotions. Or perhaps try two-color quilts in multiple iterations. To pique your interest, here are three very different ideas using the same two colors, which I drew in EQ8. Imagine all the ways you could extend this, learning how the arrangements of shape and value affect the outcome.
Geometric Shapes and Patterns: Devote a series to exploring different geometric shapes, patterns, or quilt blocks. Pick a specific shape to feature, such as squares, triangles, hexagons, or specific geometric arrangements in each piece. A series of maple leaf or churn dash quilts would let you explore different ways to arrange shapes, values, and colors. In terms of pattern, do you fall in love again and again with batiks, or solids, or repro prints? Use that fascination and try new ways of showing those fabrics.

Cultural Influences: Design a series inspired by the vibrant colors, patterns, and motifs of a particular culture or region. This could involve researching and incorporating elements from traditional textiles or art forms. Are you inspired by Australian or African prints, or Japanese shibori? Do Amish quilts make your heart sing? How can you use these inspirations to explore your own style?

Nature and Landscapes: Focus on a natural theme by creating a series inspired by landscapes, flora, or fauna. Each quilt could represent a different season, habitat, or specific plant or animal species. See my recent post with the beginning of my Animal Alphabet series.

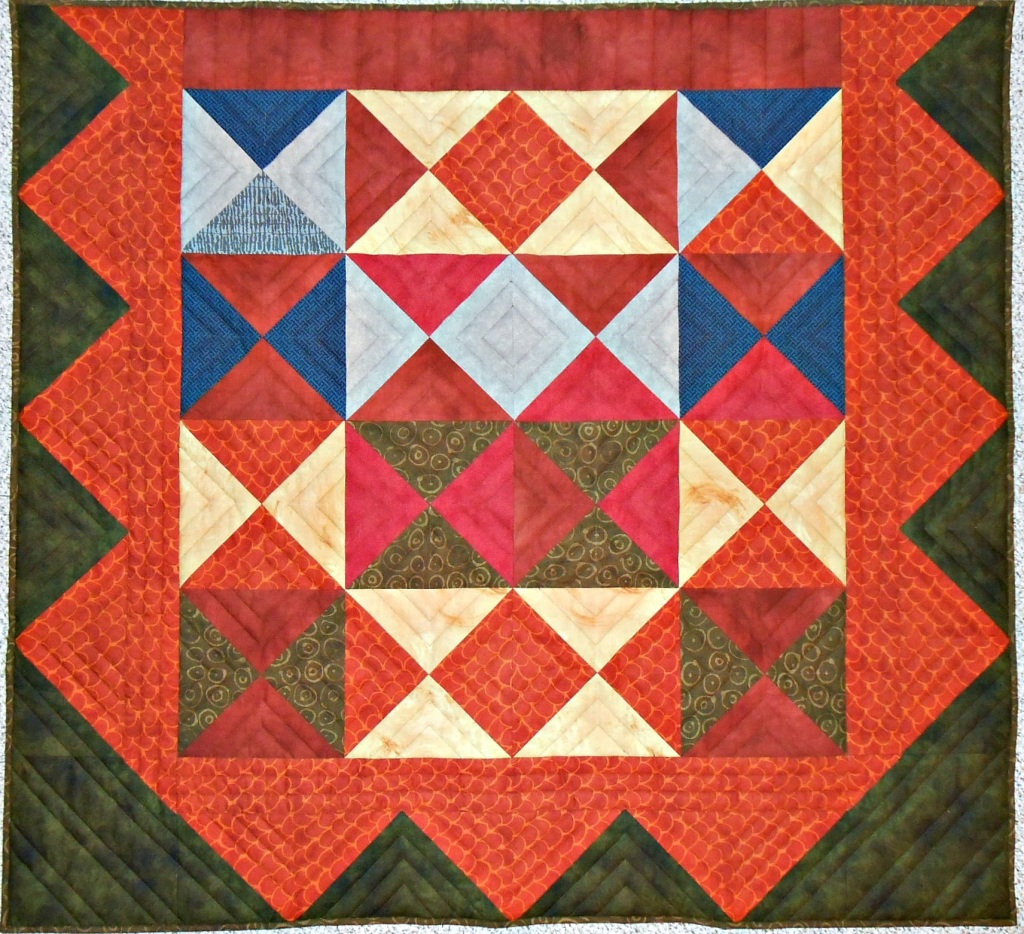
Historical Eras: Explore different historical eras through quilting. Create a series that captures the essence of specific time periods, incorporating historical textiles, patterns, and colors that define each era. I’ve made three quilts inspired by specific historical quilts from approximately 1800-1820. (See posts on My Harlequin Medallion Quilt, Fire & Ice, and Martha Washington’s Children’s Games.) None of them hews exactly to their inspiration pieces, since I modified them to suit my tastes and desires. While they are very different from each other and don’t appear to be of the same “voice,” each taught me lessons about design, contributing to my overall body of work in ways that might not be apparent. Click on any image to see larger.
Emotional States: Express a range of emotions through quilts. Develop a series that conveys emotions such as joy, sorrow, excitement, or serenity. Experiment with color, composition, and fabric choices to evoke these feelings.

Upcycled Materials: Challenge yourself to create a series using upcycled or repurposed materials. Each quilt could feature a unique combination of reclaimed fabrics, promoting sustainability and creativity. Sherri Lynn Wood‘s quilting might get you started.

Personal Journey: Chronicle your personal journey or experiences through a series of quilts. Each piece could represent a different chapter or significant moment, using symbols, colors, and patterns that hold personal meaning.

Technique Focus: Explore a specific quilting technique in-depth for a series. This could include appliqué, patchwork, or free-motion quilting. Each quilt in the series showcases the artist’s increasing mastery of the chosen technique.

Literary or Social Themes: Draw inspiration from literature or music for a quilt series. Select a favorite song, book, poem, or theatrical performance theme, and interpret it visually through quilts. Each piece could represent a different aspect of the work. Or maybe you’d like to make a series exploring a social concern of yours, such as democracy, immigration, or the climate crisis.


There are so many ways to work in series. Choosing a specific theme lets a quilter delve into various aspects of their craft with focus. The key is to not just imitate but to explore and innovate, creating a cohesive and meaningful body of work that showcases their skills and unique artistic voice.

Do any of these ideas inspire you? Tell me more in comments!

Working in Series #2

Happy February, everyone! This tiny month has always been, for me, the longest month of the year. Adding an extra day doesn’t help that at all. However, the sun is shining as I write this, and the days are noticeably longer. I’ll continue to mutter my magic spell under my breath: “Spring is almost here!” And once I’ve said it enough times, it will come true! How do you get through these last few weeks of meteorological winter?


In today’s post I’m going to speak more to the subject of working in series, and the benefits of it. As said in the first post, “Perhaps the most obvious [benefit] is that it allows the maker to explore and learn from a format, topic, medium, or theme. Their work has an opportunity to develop across a number of pieces. That might mean “develop” in terms of expertise, or in terms of creating an overarching narrative.” 

The idea of creating a narrative is that the quilts, taken as a group, create a context for each other. While one piece might be interesting on its own, with multiple pieces the artist can show different sides of a story or theme, making the story more layered. Consider any favorite fiction series you enjoy, whether in written or visual form. While a TV episode or a novel, if well-presented, probably stands on its own, having the longer arc of the story gives you more background and understanding of the characters and setting. And because the information content can be spread across multiple pieces, each of them can be more focused, with a clear story line.

The same is true in quilting and other 2D visual arts. With a “narrative” series of quilts, you have more than development of style or expertise, as I discussed in the last post. You also have the benefit of developing an idea.

While the majority of my quilts have focused on more traditional geometric compositions, I’ve also made some pieces breaking that mold. Two years ago I finished a small appliqué quilt, Rr rabbit.

I’ve long been amused and intrigued by the bodies of some animals. Rabbits have long, soft lines, a fluidity I wanted to capture here. Cats are like that, too. Maybe that’s why both cats and rabbits have been embodied in art since early in human history. But once I created the shape of the rabbit, I wasn’t sure how to fill the space, other than using a landscape. Nope, that wasn’t the right answer for me. Ultimately, as you see, I hit the notion of adding the letters and word, creating an image that would suit a child’s alphabet book.

I hung the rabbit at the bottom of my stairs and enjoyed it every time I entered my studio. And then at the beginning of 2023, I decided to make a crow. A pink crow. At the time, I didn’t realize it would be one of a series. However, after creating the center block with crow appliquéd upon it, I knew that it was part of a bigger story. Cc crow was born.

As you can see, she (the crow is female) and her setting fit neatly into the format of medallion quilt. And aside from being similar to the rabbit in terms of providing a silhouette and few details, and including the letters and word, she doesn’t initially appear to be part of a series. However, the series was born.

Since then, I’ve enjoyed making three more quilts in my Animal Alphabet series. You can click on an image to see it bigger.

You might or might not notice some of the repetition of fabrics used. The formats are somewhat different; Rr rabbits has four panels rather than one. Ff fox has a different font style for lettering. None of these three are as obviously “medallion” format as the crow’s quilt.

But between their similarities and differences, they tell a more complete story than Cc crow does by herself.

With a series, artists start a conversation with viewers. It’s not just about looking at pictures; it’s about thinking, interpreting, and finding meaning. Viewers become part of the story by interacting with the art. It’s like the artist and the audience are chatting through the pictures. When I showed Cc crow, Rr rabbits, and Ff fox at my solo show last summer, viewers were engaged. They spent time looking for the common elements, and asking me about the series and what else I have planned.

When artworks come together as a series, they leave a lasting impression. The story sticks in your mind because of the way everything fits together. This is great for artists – it means people are more likely to remember and talk about their work. It’s like creating a visual story that stays with the audience.

For me, creating these works as a series allows me the opportunity to develop my techniques and style, as well as to tell a larger story. It offers a chance to engage with the viewers in a way that a solo piece does not.

What’s next up for the Animal Alphabet series? In truth, I haven’t decided yet what animal to depict next. However, I do believe there are more to come!

Are there any series of quilts that have stayed with you long after seeing them? Who was the artist (if you remember), and why are the quilts memorable for you? Tell me about it in comments!

Working in Series #1

And thus begins a series on series…

One of the things I’ve done as a quilter, both consciously and not, is to work in series. For example, you might know who I am because I make medallion quilts. That is, I’ve made a series of medallion quilts, primarily since about 2013. It is not my exclusive format, but it is the most persistent one over that time. 

There are a number of benefits to working this way. Perhaps the most obvious is that it allows the maker to explore and learn from a format, topic, medium, or theme. Their work has an opportunity to develop across a number of pieces. That might mean “develop” in terms of expertise, or in terms of creating an overarching narrative. 

For me, within the format of medallion quilts, the primary development has been in my expertise. Take a look at these two quilts. One is from 2014, and one is from 2020. 

They are similar in size, and they both use simple blocks (although Cimarron is somewhat more complex). They both use a combination of distinct prints and tone-on-tones. They both have borders that seem to cross from one to another. What’s different? Cimarron, in teals, rust, and golds, has stronger value contrast. The value is used to create deliberate crossing from one border to the next, while the unnamed top has a mush of splotchy patterns and one-note values. The blending across borders is not deliberate, it’s accidental, and it’s simply from poor use of value.

That is a lesson I specifically remember learning from that 2014 top. Even though I’d already made scores of quilts, and even though I’d read about and experienced value as an important design element from my beginnings as a quilter, I was still fairly early in my understanding of medallion quilts.

If I had stopped making medallions after that mushy peach and purple one, my learning about medallions would have stopped, too. Instead, I transformed that lesson into more aesthetically successful quilts, in part by more consciously using value as a design tool.

Here’s another example. In 2022 I decided to play with a format known as Circle of Nine. It’s a setting similar to the medallion, but with a shift of space usage to create the “circle.” It was developed and popularized by Janet Houts and Jean Ann Wright. Here are three small quilts I made for donation using the format.

You can see the same form used across a series of quilts, with similar simple blocks and simple color schemes. Repeating the form but changing some of the variables (color, shape, value) gave significantly different outcomes. Again you can see how much difference value, especially, makes to their effectiveness. The aqua and peach one is, again, a little mushy. The blue and pink one is better in some ways, but there are issues, with both value and shape. The third, in purple and aqua, is in my opinion the most effective. Even when the image is desaturated to greyscale, the values show separately. Color use is also better, by including yellow as a third and accent color.

As much as I’m intrigued by the format (setting) of the Circle of Nine, these quilts were disappointing. I thought a lot about the problems and where things went wrong. I looked for help by reading more carefully in the book (linked above), talking with Jim about it, and looking for examples of more quilts online.

With somewhat better understanding, I made Eclipse, below.

The colors here are similar to the best of the three above, but the use of value and shape are significantly different, leading to a result I prefer.

As mentioned above, there are a number of potential benefits to working in series. Being able to explore and learn from an idea, theme, format, or medium is one.

Do you choose to work in series in quilting or other areas of your life? Tell me about it, including some of your successes and failures in comments!

Creative Manifesto, Feed Dogs, and More

This year the blog hit its tenth anniversary, so I pulled a few things from archives, both from here and elsewhere.

First up is another look at my creative manifesto, as published here ten years ago today. Inspired by another blogger, I thought about how I’d like to define myself as a creative person. “How I’d define myself” is the same as “what story I want to tell about myself.” In my experience, people believe the stories they tell themselves, so it’s important to be careful about what you say.

Here’s my creative manifesto from the old blog post, describing who I am as a quilter, and what kind of artist I want to be.

  • I am creative, which means I create.
  • Transforming things creatively is part of transforming me.
  • Writing is part of my creative expression.
  • I include me in all of my work.
  • I try new things, even if it scares me.
  • I practice skills and don’t wait for the skills fairy to wave her magic wand.
  • I learn from frustration.
  • I take advantage of opportunities to grow.
  • I don’t have to do everything or like everything I do.
  • I help, teach, encourage, and try to inspire others.
  • I credit others for their work and words.
  • I value others’ work, even if I don’t like it.
  • I respect the history of quilting by learning more about it.
  • I respect the present and future of quilting by being part of it.
  • I am open to new ways of doing familiar things.
  • I say “thank you.”
  • Materials are to use, not hoard.
  • I share.

Even with the passage of time, I think this is a pretty good description of the story I tell myself about my life as a creative, creating person.

*****

Next up, I looked at Facebook “memories” earlier this week and saw this post from 14 years ago:

The comments following it went like this:

Friend 1: Uh, can I buy a vowel, Vanna?

Friend 2: Sounds like Melanie has had enough of the hand-stitching & has gone back to machine sewing…

Friend 1: Thank you for the translation! I guess I don’t speak “Quiltish”

Me: Yes, I love my sewing machines. But I also bought my first thimble the other day, and I think I love it, too. Makes stitching by hand oh so much easier.

Friend 3: I also have powerful feed dogs. Or is it, powerful dogs that I need to feed?

Me: do they have interchangeable feet?

Friend 1: Interchangeable feet sounds good–mine aren’t what they used to be. Those dogs can really bark!

Friend 3: I don’t know, but I could try to interchange them. Moby’s feet on Ranger, Ranger’s feet on Evie, and then big Moby must get Evie’s dainty feet. That would be really cool!

*****

Some of you who’ve been here all along are used to the transition in editing tools. I’m still getting used to it and find that some aspects are okay and others are quite awkward. :/

*****

Another thing that’s happened while on my hiatus is the addition of a lot more ads inserted in posts. I don’t choose them and I don’t benefit by them, aside from that WordPress makes the platform free for me to publish on. However, I think the readers must find it quite annoying. Readers, what do you think of the ads? Are they inserted in multiple places within the post? I don’t know how other people experience them. Those of you with blogs, have you found it worthwhile to pay up for an ad-free blog? Let me know in comments.

*****

Finally, I’ll end with a photo I found from six years ago, October 2017. I was starting a new quilt as a demo for a class. I used a design from the book Big Book of Scrap Quilts, published by Oxmoor House in 2005. The quilt pattern is called “Dizzy Geese,” designed by Joan Streck. Dizzy Geese is a block quilt, with a 17″ block made with templates. I redrew it as a 16″ block and paper-pieced it.

The resulting quilt was called “Christmas is Coming!” and you can see it at the linked post.

That’s it for this week’s trip down memory lane. I’d love for you to share thoughts about your view of your creative self, or other memories you have about your blog or how your work has changed over time.

10 Things I Learned at Quilting Camp

This year I had the privilege of going to summer sleep-away camp! In truth it wasn’t camping; there were very comfortable accommodations in tidy little cottages. 

The setting was the Madeline Island School of the Arts, a multi-campus school featuring 5-day classes with creative masters in quilting and other fiber arts, painting, photography, and other media. My class was Fabulous Faces, as taught by Jean Impey

Jean is a California-based artist and quilter who, along with the iconic Freddy Moran, developed a process and style for creating small portrait quilts. Jean writes a short story to go along with each face. The story may contribute to the development of the picture, or the picture may lend focus to the story. Either way, the combination of image and words leads to charming, quirky, interesting art work. 

Jean’s friendly, casual teaching style is deceptive, as she is adept at teaching more than it might seem in the moment. She conveys techniques and tips to the class as a whole, and offers a lot of individual time for consulting on projects. 

Here are 10 things I learned in the class:

1. Work quickly, at least at first. Don’t overthink your process. The work isn’t precious. It’s a small piece and if you don’t like it, you haven’t lost much time, supplies, or energy. Almost anything you don’t like can be remedied later. Either way, you will learn some things about the structure and techniques of the process. 

2. Glue sticks are a simple conveyor for glue. Think about it — almost any fusible we use for appliqué, whether Wonder Under, Steam A Seam, or whatever, is just heat-activated glue attached to some matrix. Glue sticks have a variety of uses, including sticking background pieces together, or even gluing backing pieces together. And of course you can use it to attach appliqué to the background.

See the change in fabric on Amy’s right side? That is a small piece glued onto a larger piece, from which I’d already cut a square. Also the triangles along the top edge? Those aren’t pieced. I folded a strip of fabric accordian-style, cut them, and glued them down.

Use the glue stick with a light hand at first. When you’re sure of placement, press with a hot, dry iron. If there’s a chance the glue will get on the iron, you might use a pressing cloth to protect it. 

3. If you’re in a class with Jean or anyone else, find out what the teacher has to say; understand why; then consider adapting the methods to your own work

Jean’s templates for face size, neck, and eyes will create a face of the style she makes. If you rebel against making someone else’s style, like I do, you don’t have to use any of them. (Freddy Moran’s faces are markedly different.) However, there’s some method to her madness and I’d recommend you go with the templates (or similar) at first. Try it the teacher’s way before deciding you won’t.

Here’s why. First, using templates or guides allows you to focus on process and not get stuck on shapes to start. You can develop your own style from there. 

Second, she’s thought through the proportions. For instance, if you make the neck realistically thick, it will look too thick. If you make the eyes realistically sized, they will look too small. 

Third, while Jean’s style is somewhat like a caricature, it also gives space to emphasize facial expression, and the expression is key to the story the portrait tells.

4. Play with the expression by changing the tilt and placement of the facial features and hair. A slight tip of an eyebrow, a change in placement of the iris, an altered parting of the lips convey different thoughts of the character. 

As made, Josie is admiring the, um, swagger of a cowboy in his Wranglers. If she was looking up instead of to the side, she might have been rolling her eyes. The connotation would be completely different.

Extend this thought for whatever process or style you’re using. Play a bit. Try rearranging values in a block quilt; try adding a contrasting color; try appliquéing circles to minimize some feature you don’t like. 

5. Novelty fabrics are fun. Even if they’re not your thing (as they aren’t mine), they can be used to help tell a story. Note the background fabric on Josie. If nothing else said so, the background tells you that Josie is a cowgirl. She’s a ropin’ and ridin’, barrel-racing, calf-roping rodeo queen. That conjures up all sort of images of how Josie lives and who she spends time with. 

Again, extending this idea, try using fabrics you don’t normally use. Don’t like batiks, Civil War repros, or solids? Challenge yourself to use the thing you don’t like, to see what it can add to the story. 

6. Stitch the appliqué down and quilt at the same time. Since I have a longarm, generally I’ve done my appliqué and quilting as separate processes. That’s still appropriate and useful for many projects. But for some, especially smaller pieces, combining the steps makes short work of both. 

You can see on both my pieces here that I’ve used straight-line stitching across the surface. That provides the quilting structure and a uniformity of texture to begin. After that comes the feature quilting, outlining around the edges to provide a more secure raw-edge appliqué.

7. Quilt short distances at a time. Jean’s style is to do sketch outlining of the appliquéd features, using black thread to create a strong outline. She makes a sketchy line by going back and forth two or three inches at a time. You don’t have to go all the way around a shape in a single pass, and then repeat that. Stitch forward, stitch backward, stitch forward farther, stitch backward… As you continue, you make the line multiple times, giving it an emphatic heft. 

8. Quilting this way on my domestic machine is FUN! In truth, this is one of the biggest revelations for me, as I hadn’t expected to even try it, much less enjoy it. Seeing the stitching laid down and how it transforms the piece is like magic. It seems to reveal the true piece as you go, in ways that a pretty blanket stitch around an appliqué does not. See point #3 above: Try it the teacher’s way before deciding you won’t.

9. Use a hopping foot and leave the feed dogs up. The hopping foot allows the movement of the quilt sandwich while outline quilting, as a regular presser foot would not. Of course your mileage may vary, but for me, I didn’t need to drop the feed dogs. That helped me a lot, because the lever to raise and lower mine doesn’t work well.

Drop your shoulders and roll them back. Relax and take a deep breath. Work a practice piece first if you’re intimidated to start on your “real” project. But just stitch small segments at a time. It’s quilting, not surgery. Nothing bad will happen if you mess up. 

10. Consider how to incorporate your own style. I used pink thread on Amy’s lips rather than black, leaving her pretty and feminine, and didn’t use a bit of black thread on Josie. I also added a border or frame around Amy’s portrait, which Jean doesn’t do. Even though the shapes are similar to those Jean makes, I think both my finished portraits look like my own work. 

While I probably won’t take another MISA class due to the distance and expense, it was worth it to me this time for a variety of reasons. Jean is a terrific teacher and I learned some lessons to carry into future projects.