As discussed before (here and here,) I’m creating a quilt inspired by a historical work held by the International Quilt Study Center & Museum. You can find the inspiration quilt here. And you can find more information about it here.
I’m not reproducing the original quilt, but trying to honor it and its maker. In so doing, I’m changing some aspects of the design. The size is somewhat smaller than the original, as mine will finish at about 68″ square, while the original is listed as 79″ x 81″. Also, I don’t have a pattern so my proportions are somewhat different as I estimate from the photo. And I’m changing the center block and corner blocks, while maintaining the feel of the original.
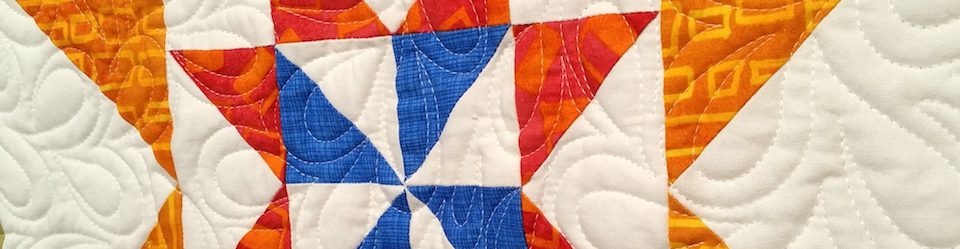
Because of the construction challenges this project offers, I’m building it in parts. Here is a photo of the “parts” so far, laid out on my beige studio carpet. The places where the carpet shows are where more parts are needed, such as for the big corner blocks.

Because the center block is appliquéd, I’ll finish it before adding any borders. (Nope, it’s not done yet. Today Jim helped me decide the final design for it. He really is the best consultant, as he tries things I don’t think of. Those little squares on point? That was his idea.)
If you’ve ever used traditional piecing to make long strips of triangles for a border, you know it is fraught with lots of opportunity for error. I used my new paper piecing skills to make mine. While the process is slow and fussy, and wastes fabric and thread, it is easy enough and created borders I’m really happy with. I’ll take the waste and the pace in exchange for the quality.
For those corner blocks, I’m considering including my initials in one and the year in another. However, that leaves two more blocks and I’m not sure what to use in them. Any ideas?
I’m really excited about this quilt, as I’m able to honor an amazing piece of art that’s 200 years old, and its artist, while contributing my take on the design and incorporating some new-to-me techniques.

Gorgeous!
Thanks!
My suggestion is to use the remaining two corners for something that will refer back to the original quilt.
I am glad to learn about the paper pieced borders. I need a lot of help with precision so I will have to try that!
It is so stunning, the original maker would be thrilled to know about your homage!
Thanks, Gwen. No matter what I do with the corners, all 4 will have shapes in them to … “mimic” isn’t the right word … maybe “refer to” works best … refer back to the original. The original has a framing for each corner that is “on point,” and mine will have that feel, also. My only question is what to put within the frames. Thanks again for your kind words.
Oh, OK. I love those shapes in the original, so I will be happy to see how you interpret those!
Wowser, this one’s going to be a stunner. The on point small squares in the middle add a nice filigree touch without being fussy.
Today we went to the St Louis Art Museum. All the non-European art we saw there made me want to make stuff in 2-color or 2-tone, just carry this idea into extremes of non-precision, or precision in non-regular ways… Not sure if that makes sense but I figure if anyone can make sense of it, you will…
Maybe graphic in a non-regular way? Quilt patterns typically repeat the same motif or motifs, but it would be fun to alter the patterns subtly across the surface.
Yes, or regular but not on a square grid. Think southwestern (Navajo or Pueblo) pottery, for just one example. But also things like African textiles… my brain is not big enough…
Wonderful progress! I’ve been glad to learn paper piecing, too, for the same reasons you’re liking it.
Well, as you may know, I’ve long resisted considering it as a technique. But I’m in a learning mode these days and when I saw the class offered, figured I should take it. Now I’m very glad I did. Thanks for the cheers!
Put a catbird in one corner. Maybe a rabbit in the fourth?
You know, the catbird is a flier. And the rabbit loves to cover lots of ground.
HAHA you know me too well! 🙂
Absolutely beautiful!
🙂
I like the other suggestions on your corners. My thought was to repeat the star element in some form. Looking good.
I think that’s what I’ll be doing, though I’m not sure yet what form! Thanks much!
That’s coming along nicely!
Thanks, Mary!
Spectacular! Those teenie, tiny diamonds in the middle leave me in awe of your piecing skills.
The diamonds in the middle are appliqued, so no need to be in too much awe! Thanks. 🙂
Ah, but you have not yet seen my applique, so I’m still impressed!
I like the on point squares, it’s a good touch. It’s looking gorgeous.
How about the town &/or state it was made in for one of the corners?
Thank you, Norma. I love those little squares! Thanks, too, for the corner ideas. I’m still pondering it… 🙂
Where is the “Super Like” button in WordPress to click on? I super like this but I am now mad with you because now I have another piece I want to make someday 🙂
Thanks, Tierney. Really all red and white quilts are dramatic because of their contrast, so you have a lot of “supers” to choose from!
How about the name of the quilt in one corner, and both the start and finish dates? That brings you up to 4 corners. I must say, the piecing is exquisitely perfect on this quilt, it’s wonderful!
Thank you, Kate. Name of the quilt: ?? I’m leaning toward “Fire & Ice,” but mostly because that’s the only thing I’ve thought of so far. 🙂
I like that, it works well with the ‘snowflake’ star in the centre. I know it’s not six pointed, but it gives that impression, like those wonderful Norwegian knit sweaters in red and white.
To me it looks more Nordic all the time.
That is looking super cool!
Thank you, VD!
I really like this quilt. You’ve done a fabulous job so far. I agree with paper piecing the triangle borders. I just did that on a quilt this past summer that is 68 X 68 and discovered it was much easier and faster to pin up the paper on one side and pin up the finished part on the other so things are not flopping around so and it was easier to work with. It was frustrating until I did that.
I did that, too, Cindi. Pinning the paper into loose rolls made it fairly easy to work with. I started the fabric in the middle and worked out from there. Thanks for the nice comments.