
Here is a quick primer on quick quilt backs. I did not originate this method, and just learned about it recently, but I’ve already used it.
If you make quilts wider than 36″, you probably piece your backs. Some of us like to create a quilt back from one fabric. Others like multiple fabrics, sometimes in long panels creating wide stripes, and sometimes more creatively pieced than that.
This method is for making backs from one long piece of yardage. It doesn’t work especially well for directional prints or geometrics that should match, like plaids. But it’s great for non-directional designs.
Measure your quilt top for width and length. The back needs to be 6-8″ bigger in both directions. If you take your quilt to a long-arm professional, check to see what is required.
Example: top is 48″x56″. Back should be approximately 56″x64″, or bigger. I added 8″ in each direction.
Assume yardage is approximately 42″ wide by some amount long. When the back is done, it will be approximately twice as wide, by half as long. You will lose some area to the seam allowance and trimming. For example, a piece of fabric 42″x108″ (WOFx3 yards) will create a back about 80″x54″.
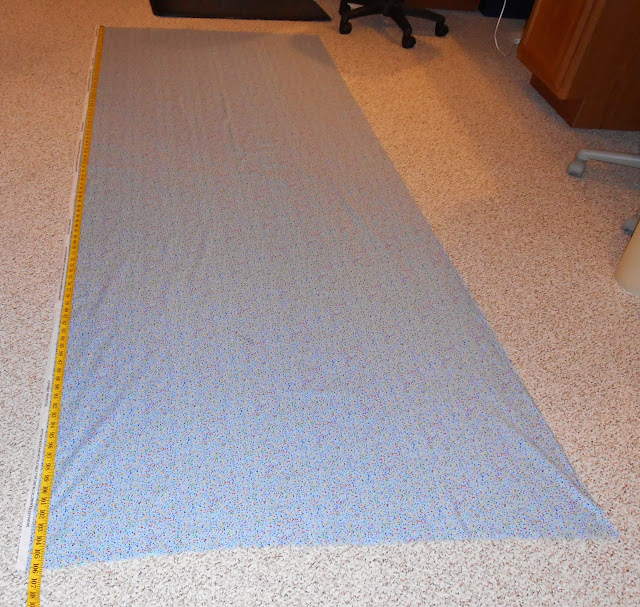
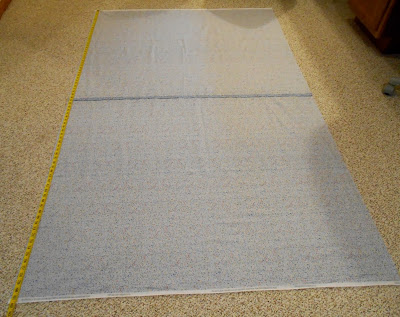
One long piece of fabric.

It’s 106″ long, not quite 3 yards.

Fold it in half the long way, along the selvage. The folded length is half, or 53″ long.
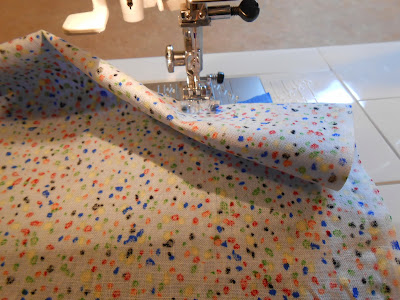
Start stitching along the selvage at the folded end. I don’t have the presser foot down; I’m just showing you the fold.

I put a piece of tape on my machine bed to make it easier to feed a wide seam allowance. The seam allowance should be the selvage PLUS about a half inch. You will cut off the selvage later.

See the red pen cap? It points at the seam. I’m going to cut off the selvage, leaving a seam allowance of about 1/2″.
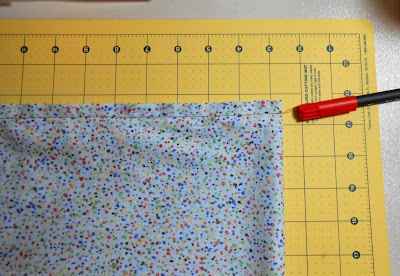
See the red pen cap? It shows you the seam again, with selvage cut off. On the RIGHT side of the fabric is the fold where you started stitching. Next you’ll cut off the fold.

The fold is next to the ruler edge. Cut it off.
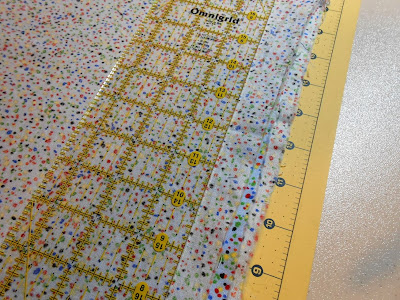
Here are the RAW edges from the end opposite the fold. Cut it off, too.
The quilt back. See the seam in the middle? I pressed it open. Note the selvage — the one you DIDN’T cut off, at the bottom of the picture.

That finished back is 81″, or approximately twice the original WOF. Remember, I lost a little to trimming.

Now it is 52″ along the selvage, or about half the original length of 106″. Remember, I lost some to trimming.
So instead of a piece of yardage 42″x106″, I have a back that is 81″x52″.
Not including all the time to stop for photos, this took me about 10 minutes. I can use it for any quilt top that is about 73″x44″, or smaller.
Have you ever tried this method? It won’t work for every quilt or every piece of yardage, but I think it’s a pretty slick trick.
NOTE: a fellow Stashbuster, Nancie V, says she starts the seam at the open end, rather than the fold. It saves her the trouble of manipulating the large piece of fabric to fold it. ALSO, because she quilts on her DSM rather than a long-arm, she doesn’t trim the raw edges. Both these tips make the process even faster! Thanks, Nancie!

This is very cool Melanie! I’m wondering if you’re aware of astronaut Karen Nyberg’s global community space quilt project. I hope you don’t mind my posting the video, but she explains the project MUCH better than I can. Maybe you and some of your readers would be interested in participating in the project!
Hi Alex,
Thanks for taking a look. I’m actually planning to post on this. You’re right. A lot of quilters would be interested in joining her.
Thanks again. Hope you have a great day!
Your pictures are worth thousands of words. Thanks for the clear explanation!
You’re welcome! Thanks for taking a look.
That’s exactly how I piece my backs unless it’s a directional patterned fabric. You’ve confirmed that I’m on the right track.Thanks for sharing.
Oh Lucie, you’re on more than the right track! 🙂
Great tips! I’m totally going to use this. Thanks.
Funny how simple it is, isn’t it?
Thanks for taking a look and commenting today.
LOL you are on Stashbusters too…but since I follow your blog, I got that email before I visited Stashbusters!!
Thank you!!! So many ladies on the Stashbusters Yahoo group have been talking about this method, but the written descriptions didn’t do it for me. I just asked last night for a tutorial with lots of pictures, and you delivered!!! I’m going to post a link to your blog on the group so others that need the pictures can come find this out!! BLESS YOU!!!!!
You are more than welcome. I put the link up already, but having it again never hurts.
And always thanks for blessings. 🙂
This technique works well. I use it quite frequently. The one caution is that it does not give good results with directional fabric. When there is a pattern that must be oriented up to down, you need to cut the fabric in half first, then rotate one piece and then sew the two selvedges together.
Great photo tutorial!
Thanks, Peggy. Agreed on the directional issue, as mentioned near the top. ALSO, in truth it isn’t efficient for all sizes needed. Last problem: as a long-arm quilter, I prefer the seam to be through the long dimension, rather than the short one as shown here.
All that said, it WILL work for me often, and I’ll find it very useful.
Thanks for taking a look!