
Welcome to Catbird Quilt Studio’s Medallion Sew-Along! If you’re just joining us, you’re not too late. Part 1 of the Sew-Along can be found here, and other resources are under the Medallion Sew-Along tab.
Just follow this blog for updates if you’d like to join the fun!
My goals for this project are to have fun making medallion quilts, each fresh and new with an original design, and to help you do the same. If you’ve made medallions before, you may have some sense of the process. The difference here is the lack of a pattern. If you want a pattern, you’ve come to the wrong place! YOU will make your own decisions for color and value, for shape and size, and even for how many borders you’ll add. My job is to help you with strategies for those decisions.
In Part 1 I told you we will have two tracks. I encourage you to read both tracks, as both discuss strategy. (This is a LONG post. Don’t hesitate to ask if you have questions.)
Track 1 assumes you start with a block that finishes at 15″. I’ve provided a pattern you’re welcome to use, plus ideas for other 15″ blocks.
Track 2 makes no assumptions on your starting block. (There are some ideas for unusual blocks in this post.) Each quilter will have a different size, and what I can help with is how to make decisions. We’ll talk about sizing, proportion, intricacy, color, and problem solving. You may have a lot of questions and I’ll help as well as I can.
A COMMENT ABOUT PIECING ACCURACY
All of my directions assume 1/4″ seams. If you sew very scant seams, your pieces may be too large. If you sew wide seams, your pieces may be small. There are solutions to these problems, some of which I’ll address as we go.
Certainly one solution is to just not fuss about it — overlarge pieces can be whacked off. Pieces that are too small can have something added on. If you haven’t seen Gwen Marston’s books on liberated quilting, I encourage you to take a look. The styling is fresh and fun, and as she makes note, actually traditional! Our foremothers solved a lot of size problems with just these solutions.
But if you need help with accuracy, you can find tips here.
NOTES FOR BOTH TRACKS
Rather than commenting each time “finished” or “unfinished,” my instructions will assume unfinished is cutting sizes, and your sewn pieces are finished size.
And I want to share some general thoughts about border design. My work focuses on pieced quilts. I’ve done very little applique and no foundation piecing. These are wonderful ways to build borders. Feel free to include them in your project, even though I won’t discuss them much. If you’d like some ideas for pieced borders, check here and here.
Not every border needs to be fancy. You can choose unpieced strips, with or without corner blocks, for any border, or even for ALL of your borders! There are two great reasons to use unpieced strips. One is to give the eye a place to rest. Movement is good. Too much movement is unsettling. Another is that unpieced strips give you the chance to change the size of your top. Changing size might be to correct for precision issues, to deal with an odd size like a border stripe, or just to add an amount that lets your next border fit correctly.
For example, if your top so far would measure 21.25″ (we’ll see this in Track 1, on-point setting below,) it’s hard to get a pieced border to fit that. But if you add a spacer strip finishing at 1.375″, the finished measure after adding is 24″. That’s an easy size to work with!
When I use strips, I cut them along the selvage (with the grain, NOT width of fabric) whenever possible. They have less stretch and are easier to manage when sewing on. (For help on figuring length for a strip border, see Bonnie Hunter’s Quiltville.com.)
For pieced borders, determine either the total length or the length without corners and find numbers that divide nicely into. For example, a 24″ strip can be divided into 1″, 1.5″, 2″, 3″, 4″, 6″, and 12″ units easily.
Another border principle I find helpful is to deliberately UNmatch seams. If two adjacent borders are on the same scale, say with patches 4″ wide, the seams better match up. But if one border has 4″ pieces and the next has 5″ pieces, the seams won’t match up and won’t even look like they’re supposed to. Fudging is easier.
Your borders don’t have to be symmetrical! Your top/bottom borders can be different from left/right, or top/right different from bottom/left. Example: you might want to use 4-patches across the top and bottom, while using flying geese left and right.
Finally, I want you to leave room for discovery. You may have pulled a number of fabrics you expect to use, based on your center block. That’s great, but keep open the possibility of using something completely different, too. Let what’s happened already help you decide where to go next, rather than marching through in a planned way. Enjoy the journey!
TRACK 1 — the 15″ center
The first border set will take your top to 24″, and you can do it one of two ways. You can use a straight setting or an on-point setting. For more information about these and why you might choose one versus the other, take a look here.
The first option is with a STRAIGHT SETTING.
Add one border, pieced or unpieced, that will finish at 1.5″. This takes the top to 18″. Then add a border that finishes at 3″. This addition gives you a 24″ top.
The outline looks like this. Pretty simple, huh?

15″ center, 1.5″ narrow border, 3″ wide border. Finishes at 24″.
I won’t explain how to make each segment, though if you have questions I’ll be glad to help.
No corner blocks, first border:
Cut 2 strips at 2″ x 15.5″ and 2 strips at 2″ x 18.5″.
No corner blocks, second border:
Cut 2 strips at 3.5″ x 18.5″ and 2 strips at 3.5″ x 24.5″.
Corner blocks, first border:
Cut 4 strips at 2″ x 15.5″. Cut 4 squares 2″ x 2″.
Corner blocks, second border:
Cut 4 strips at 3.5″ x 18.5″. Cut 4 squares 3.5″ x 3.5″.
If you want pieced borders, decide how many units you want for each side. For the inner border at 15″ not including corner blocks, you could divide that easily into 10 square units at 1.5″, 5 units at 3″, or 3 units at 5″. For the outer border at 18″ not including corner blocks, you could have 6 square units at 3″, 4 units at 4.5″, 3 units at 6″, or 2 units at 9″.
Here’s an example with pieced borders:

15″ center, 5 units in inner border measuring 1.5 x 3″, 6 units in outer border (not including corner blocks) measuring 3 x 3″. Finishes at 24″.
And here are a couple samples I’m working on:
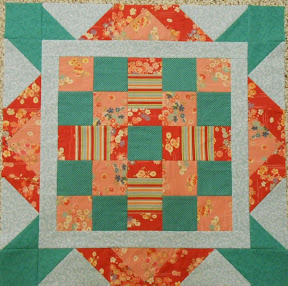
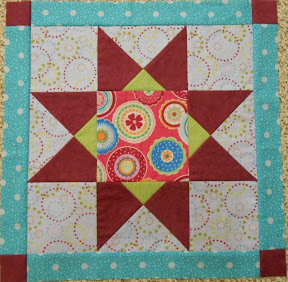
Unpieced 1.5″ inner border. 3″ outer border of flying geese and corner blocks. 3 flying geese per side, arranged with points in alternate directions.
Unpieced 1.5″ inner border with corner blocks. 3″ outer border not constructed yet. Maybe half-square triangles? Note the turquoise in the border is not used previously but is introduced here.
The second option is with an ON-POINT SETTING.

15″ center block, setting triangles, 1.375″ outer border. 24″ finish.
This piece also finishes at 24″ but with setting triangles. How do I get to 24″? Use the math for diagonals: 15 x 1.414 = 21.21. Add borders of 1.375: 21.21 + 1.375 + 1.375 = 23.96, and round up to 24.
The easiest way to add setting triangles:
Cut 2 12″ squares. Slice each square on the diagonal. Pinch the center of the long side to make a crease. Pinch the edge of the 15″ block at the center. Match the creases and pin. Smooth the triangle across the edge, careful not to stretch it. Pin generously. Repeat for the opposite side. Sew. Press toward the triangles on both sides, and trim the dog ears. Repeat for the remaining sides.
Square cut on diagonal has long bias edge. Handle gently, no pulling or stretching. Pin generously.
Trim to square at 21.75″ UNfinished. This will be 21.25″ finished.
This is an odd size. To complete the top to 24″ finished, you need to add width of 24 – 21.25 = 2.75. Because you’re adding to both sides, use 2.75/2 = 1.375.
No corner blocks:
Cut 2 strips 1.875″ x 21.75″, and cut 2 strips 1.875″ x 24.5″.
Corner blocks:
Cut 4 strips 1.875″ x 21.75″. Cut 4 squares 1.875″ x 1.875″.
Here are a couple of examples:

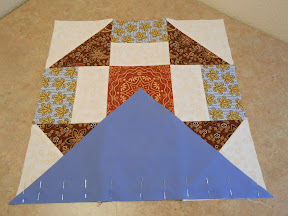
On point setting with frame, taking it to 24″. Setting triangles of a fabric I didn’t expect to use. Leave room for serendipity!

This got fancy… I used the solid blue as setting triangles and wasn’t happy with its intensity. To mute it I built the corner triangles and substituted them. Then framed with the rusty print and corner blocks to 24″.
TRACK 2 — ANY CENTER BLOCK
If you’ve read through Track 1, you probably understand the philosophy, but you may wonder how to apply it to your block. (If you didn’t read Track 1, please do.) Again, we won’t have a pattern in Track 2, and I won’t even give you a specific format. What I can do is help you with designing your own quilt as you go.
Here again, you’ll need to decide whether to use a straight setting for your block, or turn it on point. See this post for more information.
Framing
Depending on the size of your block, you may need to frame it to create an easier size to work with. For example, one of my blocks finished at 14.75″. Really! I can’t stretch it, but I could frame it. A frame finishing at 1.625″ would take my top to 18″ finish. (1.625 + 1.625 + 14.75 = 18.)
If your block is not square, you may need frames that are not the same width on each side. For example, if your block finishes at 17″ tall x 22″ wide, you might add 1.5″ strips top and bottom. And add 1″ strips on left and right. Then your framed block would finish at 20″ x 24″. These are easier dimensions to use.
Should the frame show or disappear? A negative frame, made in a color very similar to an adjacent color, will visually disappear. A positive frame, made in a contrasting color, creates an accent.
STRAIGHT SETTING
A straight setting is appropriate if your block is a non-directional square, any square that is directional “straight up,” or any rectangle.
Non-square rectangles
If your block is not square, you need to decide whether to preserve its shape, or whether you ultimately want it square. Either way, your borders will not match. Top and bottom will be different than left and right. If you want to preserve the rectangle and are using the same style of borders all around, you will need more units on the longer sides.

Rectangle center. Border blocks are all the same size, preserving rectangular. More blocks on longer side.
If you will ultimately want a square quilt, you’ll need to add asymmetrical borders, with wider ones on the longer sides. Here are examples with a rectangular block.

Rectangle center. Same number of border blocks on each side. Blocks are smaller on top and bottom, taking the quilt shape to square.
Changing the shape doesn’t have to happen in one step. You can use frames or multiple borders to move in that direction. The frames on this example show a less clumsy way to square it.

Rectangular block, outer borders same on all 4 sides. Inner frame strips square the block.
INSTRUCTIONS FOR QUILTERS USING A STRAIGHT SETTING
If you need to frame to size, do so. Then add a border or border set no greater than 5″ wide. If you start with a 18″ square block, adding 5″ borders to each side, the finished size will go to 28″.
What border style to use? How do you know what size? How many units do you need? Your own center block will help point the way. Each quilt and each quilter will have a different plan, designing as they go. But ask for help or inspiration when needed, and I will do everything I can to help.
Here is my baseball pillow panel, bordered by unpieced strips. I have a plan for the next border!
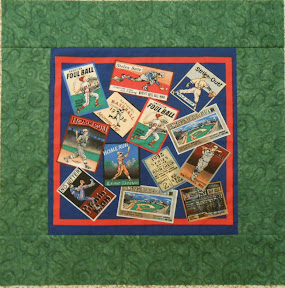
Pillow panel design doesn’t have equal height and width. I left a wider blue margin top and bottom to square the panel, before adding the green border.

I added the black unpieced border to create a sharp outline. The border actually is still wider than this. I haven’t trimmed it to size yet. Not sure where I’m going from here…
ON-POINT SETTING
In some ways, the on-point setting is easier. When you have set it, you still will have a square piece. If you have questions about how to set the square on point, see the instructions here.
Again, you may need framing to move the piece to a manageable size, one that works well with border units.
INSTRUCTIONS FOR QUILTERS USING AN ON-POINT SETTING
If you need to frame to size after setting the block on point, do so. Then add a border or border set no greater than 4″ wide. For example, if you start with a 14″ square center block and set it on point, you’ll have a 20″ block. Adding 4″ borders to each side, the finished size will go to 28″.
When your current finished size is easily divisible into units, you have choices of what units to use. Consider how the border relates to the center. Is the center block already so angular with sharp triangles that the border should calm things down? Alternatively, is the center all squares and would benefit by addition of triangles? Do you want to introduce new colors that can be continued into later surroundings? Your own center block will help you design as you go. When you get stuck or want another opinion, feel free to ask for help.
WRAPPING UP
I plan to post MSA (Medallion Sew-Along) updates every other week. I hope you’ll comment, question, and give links to your photos! (Remember links to photos in the Stashbusters folders won’t be visible to non-members.) I want to hear about your progress and challenges.
Between times I’ll continue to blog about quilting in general and medallions in particular, so join me regularly to see what we’re up to.
The next official MSA blog post is scheduled for September 12. Have fun and keep us updated with your progress!

Ok, so I took some liberties here: Stop by my blog to see this next round. I am thinking that I have some adjustments to make, however won’t be any time soon I am afraid.
Shirley
Ok, so I am getting started tonight … have been traveling and soon I will not be able to work on this at all. My DH and I are headed to Ecuador on the 24th Sept for 3 1/2 months. No sewing machine accompanying me for sure – only 1 suitcase a piece. All my projects will come to a roaring halt.
In the meantime, check out my blog … will be updating tonight. http://2busyhands.blogspot.com/p/medallion-quilt-sew-a.html
WOW Shirley! That’s a spectacular inspiration piece! Can I share?
Reblogged this on Our View from Iowa.