Tag Archives: Thread tension

Tension, Chapter 2: The Unstitching

Today is a whole new day. This morning I spoke with the machine guy at Nolting, Dan Novak. Dan and I have chatted before. He is unfailingly helpful, even when the help isn’t what I want to hear. (For example, “The machine isn’t the problem,” as said a few years ago when I had a different model than I own now.)

Today Dan said that, like any other machine, my longarm needs some maintenance. After all, I’ve had this machine for more than four years, and I’ve probably quilted 80 or more quilts on it, most of them biggish. (By my figurin’, I’ve covered about 2000 square feet with quilting, or about the footprint of a typical house in the US.) In particular, I need to start by smoothing the tension disks with a piece of emery cloth. If that doesn’t work, I may need a new tension assembly, but we’ll cross that river when we get to it.

As it turns out, I don’t have a piece of emery cloth. Tomorrow I have a bunch of errands planned, and the hardware store will be on the list.

In the meantime, there is ALWAYS plenty to do. (Say it with me, friends: “There is ALWAYS plenty to do!”) Besides paying bills, making apple sauce, doing my nails, sweeping floors, reading, writing blog posts, and the like, I also have some work to do on the quilt project. Unstitching.

Yes, some people call it “ripping,” and some people call it “frogging” (similar theory — rip it, rip it!) I always call it “unstitching.” Sort of like I always call pantyhose “stockings.” It just sounds nicer to me. I’m weird that way.

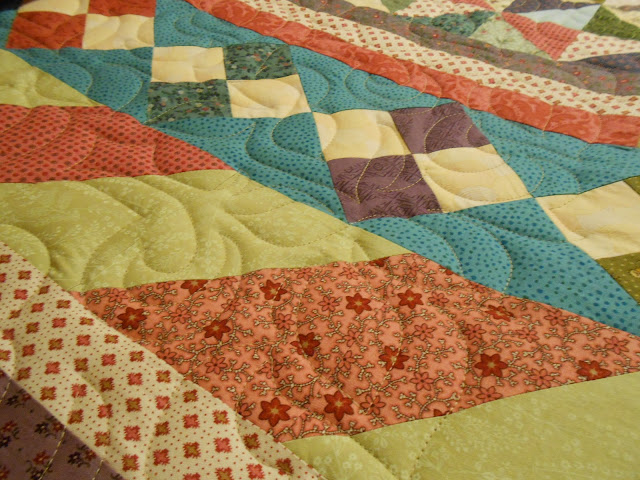
Unstitching is a part of quilting. The fact of it does not bother me. The fact that there is SO MUCH is kind of a pain. Literal pain. Leaning over the quilt frame to pick tiny stitches kind of pain. Bent back, twisted neck kind of pain.

There are ways to make it easier. First, roll the quilt forward so the area to be picked is close. There’s no need to reach or lean very far. (Don’t worry, you can roll it back when it’s cleaned up.) Then pull up a stool. Sit. Use good tools. My two favorite tools are these:

20160202_160813

That’s a Clover seam ripper and a Fiskers blunt-tipped children’s school scissors. Another help, if you have a large section to unstitch, is a way to mark the bad area. I used a couple of long straight pins as flags. But I also thought marking the area with blue tape, like marking a crime scene for a dead body would work, too.

Once the unstitching is done, there is another task. I will sew a piece of muslin along the bottom edge of my backing. The longarm can make that stitch. It won’t matter if there is loopiness and bad tension. Once the muslin is sewn on, I’ll unpin the quilt backing from the frame’s leader on the frame front. (If you don’t use a longarm, you may be unfamiliar with the terms. The leader is the piece of canvas I’ve attached the backing to, to create the bottom of the quilt sandwich.) Then I’ll pin the muslin to the leader, extending the backing or bottom layer. This will give me space to test my stitch tension after I’ve smoothed the disks and rebuilt the tension assembly.

Only then will I take the tension assembly apart.

Say it again, friends: There is ALWAYS plenty to do!

Tension, With Swearing Alert

Okay, maybe I’ll keep it clean. We’ll see how it goes.

I am quilting today. This is the big-block project. I finished the top, all gazillion half-square triangles. I made a heavily pieced back, the better to use some of the worst “quilting” fabric I’ve ever owned, John Deere logo fabric. (Yeah, there’s a story to why buy it and why use it. Another time for that.) It’s a biggish quilt, 84″ square. That is 7,056 square inches.

Yesterday I finished loading the back. It took more than one try, because that pieced up section with the horrible John Deere fabric was saggier and baggier than any little elephant. (In fact, I got it to behave reasonably well by surrounding sections of terrible fabric with pieces of better quality. Even so, the pieced section made the whole thing harder to load. But I did it.)

After loading the back I cut and loaded batting. I pressed the top and loaded it, basting along the upper and side edges to secure it. I began quilting, a simple loops and stars free-hand pattern edge to edge.

It went well. Tension was great.

After getting two-thirds of the way done — four passes out of six — I quit for the day.

This morning I began again. The fifth pass was fine.

The final pass is where the swearing begins. In fact, halfway through the final pass. I figure I got about 6,468 square inches, almost 92% of the thing quilted before the tension started acting up. I heard something weird. It looked fine on top, but I stopped a little ways away and checked. Yep, underneath was a thread nest, a wad of loops. Tracking back farther, I could see there were more issues; it started before the funny noise.

why

Okay, I spent most of an hour picking out the worst of those stitches, the ones that happened after the funny noise. Most of an hour to pick out stitches that took about 30 seconds to put in. And I began again. It was better, not great.

Last pass, remember? I took the stitching to the bottom (near) edge and tied off. I went to the other side. Changed the bobbin, rethreaded the top, cranked the top tension down slightly… And still it’s making loops underneath.

WHY????

Why does the tension change when I have NOT CHANGED THE TENSION?????

This has happened before, and frankly it pisses me off. I swear A LOT when this happens. I am not Zen about it. I do try to go about fixing in a calm and logical way. But how do you fix THIS?

Okay, not much swearing in this, but it was good to rant out loud. When I finally finish this thing (which in normal circumstances should take about 5 minutes of stitching) I will email the company and ask the machine guy. WHY??? And more importantly, how can I make it NEVER happen again?

Medallion Quilting is Done!

As happens so often in quilting (and in life,) it took longer to decide what to do than to do it. Once I’d honed in on the idea of using a pantograph and chose one, I still had to convince myself I could pull it off. The tricky part seemed to be how to advance the pattern and begin another pass, interlocking the pattern with itself. I’ve seen it done badly, creating stripes of pattern where there should be none.

As it turned out, it was pretty simple. I quickly got used to driving the machine from behind. A little music helped me shift into a dancing rhythm, keeping me light on my feet. That’s more important than you might think. You should keep your knees slightly bent, not locked, so you can move with the machine. And it’s important to keep your back straight and your shoulders relaxed to stay pain-free.

Assessment
Method: The pantograph worked fine. I like designing my own stitching pattern better, but this allowed me to add consistent texture across the quilt surface.
Tension: I hadn’t used the longarm since May, when I put everything away and locked the machine down before our son’s commissioning. When I threaded it, the top tension seemed quite tight. Taking a deep breath, I cranked it a turn or more looser, knowing I’d need to adjust it. I always check for adjustments when I baste the top down and did this time as well. The tension turned out fine, and after the first go, I didn’t adjust it again.
Batting: This was the second time I used wool batting, and I don’t love it. It quilted easily; it’s soft and lightweight. But it has very springy loft, reminding me more of cheap higher-loft polyester for the amount of stitch definition. It’s a personal preference, but my preference is for a somewhat flatter look. Still, with as dense as the piecing is, creating a heavy top, I may appreciate having the lighter weight.
Thread color: Jim helped me picked a golden tan, which disappeared on the back and does not intrude on the front.

Overall I’m happy with it.

Next week I’ll work on the binding. What color do you think I should use? I have lavender, plum, and pink to choose from.