Tag Archives: Square-in-a-square

A Gift for My Friend BJ

Recently I mentioned I’ll be giving away a few quilts. I sent off two on Friday, and yesterday (Saturday) the first one arrived for its new owner!

In July and August I had a few quilts displayed in a local quilt shop. One day my friend BJ met me there to take a look, and to enjoy some time together. BJ and I met 18 years ago (MY GOODNESS!) at the bank where we both worked. We worked closely for several years prior to her retirement, and we’ve remained friends since then.

BJ is a sports fan, and while there were a couple of the quilts she especially liked, I thought this one suited her well. It is named Play Ball! and is 46″ x 56″.

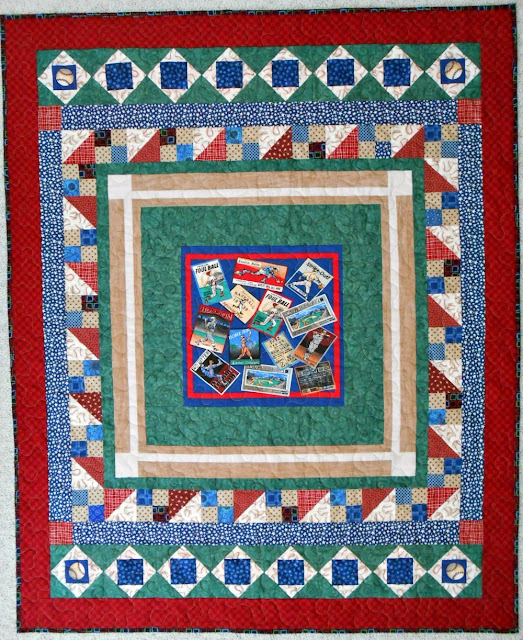
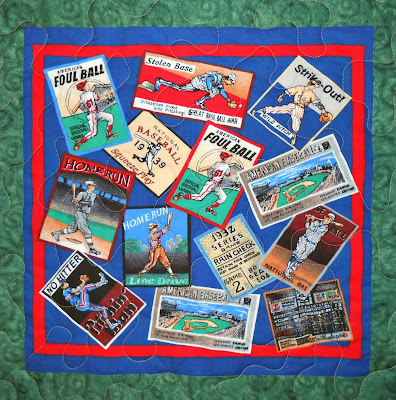
This fun little quilt started from a pillow panel. Several years ago, on my first excursion into our local Mennonite thrift shop, I found two square pillow covers. With their vintage baseball theme and strong blues, reds, and greens, likely they were used in a boy’s bedroom. Besides the square(ish) panels on the front, the envelope closures on the back were lined with small baseballs on navy blue.

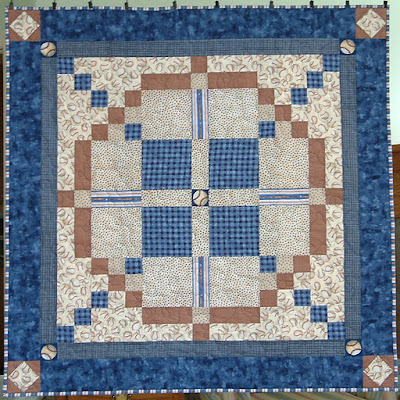
I used one panel to inspire a baby quilt for my youngest grandchild. (He is going on 5 now, so not a baby anymore.) It uses the Burgoyne Surrounded block on the front and the pillow panel to center the back.

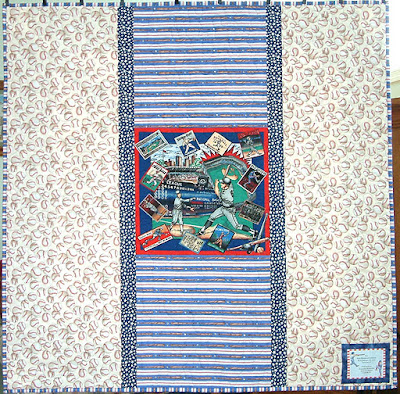
But I still had one panel left. With a nice range of color and value, I continued the baseball and All-American theme.

The dark green tone-on-tone framed the panel to represent the grass of the infield, and then I mimicked the baseline and bases in the corners with cream and tan. Spark and movement comes from the simple border of 4-patches and half-square triangles.

The busy stars print frames all that, followed by borders only on top and bottom to elongate the quilt. This border uses the “economy” block, or square-in-a-square, described in this tutorial. I was able to use four of the fussy-cut baseballs for the corner blocks. Finally I framed the whole thing with red. This gives a balance between the red, navy, and green in the center panel.

I enjoyed making this quilt. I have a feeling BJ will enjoy watching her baseball playoff games and quite a lot of football snuggled under this lap quilt.

Playing with Color and Value Placement

Recently I showed you a block that uses the economy block as the center. It’s called “Union Square,” or “Contrary Wife Variation.”

Union Square block

I showed you two different versions of it. Here is the straight set with sashing.

Union Square straight set

Union Square or Contrary Wife variation, straight set with sashing.

What a difference it makes to remove the sashing. If you’re like me, your eye starts to focus on the dark shapes rather than on the blocks. In fact, you might start to see T blocks.

Union Square unsashed

Union Square unsashed

And one more change, putting some subtle color in the blocks’ corner patches. For me, this really blurs the block outlines.

Union Square unsashed 2

Union Square unsashed, with color/value variation

Now let’s try placing the values differently. Different colors, here, too.

Union Square unsashed 3

Union Square unsashed variation

Honest to Pete, it’s the same blocks. Putting the darkest value in the corners and their adjacent wedges takes the eye directly to them. In other words, the visual weight is where the dark values are. That is accentuated by using the pale yellow to create squares on point between the dark segments.

The lesson in this, if there is one, is that the way you see a pattern or design first is not the only way it can be done. Most of us are used to using our own preferred colors. But values can be placed differently, too. Experiment with designs to see how color and value placement changes the look.


If you’d like to see my other posts on economy blocks, the first post showed you how to make the economy block ANY SIZE with my tutorial and cheat sheet. The second showed you 17 different arrangements of the block with alternate blocks. They range from simple to fairly complex. The third is linked at the top of this post. It is on blocks that use the economy block as their center.


More Fun with the Economy Block

I keep playing with the economy block, which I first wrote about in January 2014. Apparently other people do, too. It’s my most-viewed post by far, with at least several hits every day. In fact if you google “economy block”, this is the result:

Screen Shot 2015-07-16 at 9.31.52 AM

Yep. Two hundred and six MILLION results, and mine is number one. Okay, now that I’ve bragged…

The first post showed you how to make the economy block ANY SIZE with my tutorial and cheat sheet. The second showed you 17 different arrangements of the block with alternate blocks. They range from simple to fairly complex.

This week I’ve played with the economy block as the center of a bigger block. Below are two blocks. Each is sized to be 1.5 times the size of the economy block in the center. For example, with a white center below of 4″, the economy block is 8″. The points on the outside add another 4″ (2″ on each side). The total finished block size is 8″ x 1.5 = 12″.

Here is a block EQ7 calls a “Contrary Wife Variation.” I’ve also seen it called Union Square. Wouldn’t it look great as the center of a medallion quilt? 😉

Union Square block

Union Square straight set

Union Square or Contrary Wife variation, straight set with sashing.

Union Square on point

Union Square or Contrary Wife variation, set on point with sashing.

EQ7 calls this one the “Double X, No. 4” block. I think it looks a little more delicate than the one above. Also the cornerstone in the sashing helps create a wonderful secondary design.

Double X block

Double X No. 4 block

Double X str set

Double X straight setting

Double X on point

Double X on point setting

I’ve shown these in one color set, but it’s easy to imagine them in a range of colors, with more than three colors per block, or using lots of fabrics (scraps.)

There’s a lot more, but this is enough for today.

TINS and SINS and Value

TINS = Triangle in a Square

TIN

SINS = Square in a Square

SIN

Okay, I made those up. But made ya look, huh?

These will soon be the final pieced border for my Stained Glass Too. (The last border will be a narrow unpieced border to punctuate the quilt.) It will finish at 66″ x 70″.

Stained Glass Too

This quilt began with leftover hourglass blocks, which were too pretty to set aside. I’m in the midst of building that border of TINS and SINS. This is the quilt so far:

20150318_122429

ugh, shadows…


Since I shared some thoughts with you on the value of a quilt, I’ve tried to be more aware of how much time goes into what I make. While I’ll probably never track time carefully, I estimate this last pieced border will take about 15-20 hours in total. That is fabric choice, prep, cutting, stitching, pressing, assembly, and attaching. This doesn’t include design time or quilting and binding. Now figure a reasonable wage for a skilled artisan, and you can see ONE border adds up to a pile of money.

If I assume that unpieced borders take 1-2 hours and pieced borders take 10-20 hours, a quilt with several borders (and a center) might take 80 hours or more. This quilt has 9 borders, including the turquoise strip border for the final edge. Again, consider the value of my time, and tell me if you would pay me that much for my quilt.

A New Quilt for an Old Year

There’s an awful lot beyond my control during the holidays, as for most of us. I might be the only one, but stress can make me cranky. 😉

I am just about done with my “last” quilt of the year, the Flip Side. I still have to attach and stitch down the binding. (Pix and full process report when it’s done.) I figured if I worked on anything else this year, it would be one of my UFOs or something very simple.

But feeling like I did, a little out of sorts, I decided instead to take the plunge. Yes, dearies, I decided to start something hard. And why not, really? A hard quilt takes a lot of mental power, and using it there means I am not using it to fret about stuff beyond my reach.

I began with some fabrics in a pile, much of which I bought in 2014. Looking at the pile discouraged me. Most of it was very traditional brick reds, creams, tans and golds, greens. Beautiful, but lately I’ve enjoyed using bolder fabrics and want to continue in that direction. There was probably enough of the traditional stuff for tops of at least four or five queen-sized quilts.

Okay, I’ll do hard stuff, and BIG! Let’s go BIG!

A while back I published a design for a queen-sized medallion quilt.

It makes a 96″ square quilt. All the elements are simple, but because of their layout and combination, it looks complex. My first thought was to use this design. But immediately I deviated…

The 21″ center block is a 9-patch format, fancied-up churndash. I decided to change the center patch, making it a pieced patch. I made a 7″ economy block using a print I bought in Boulder City in 2011, after visiting the Hoover Dam. (Yes, I do use my own tutorials sometimes!)

economy

Beyond the center block, I used the last bits of a border stripe originally used in FFDIL’s college graduation quilt. There wasn’t enough to miter the corners, so I built 4-patches to finish them.

I used the interior stripe of blues, bronzes, and rusts. See the whole quilt here: https://catbirdquilts.wordpress.com/some-old-favorites/

The border stripe took the block to a strange size, finishing at about (but not exactly) 29.25″. Huh. I needed a spacer strip to take the center to an easier size. A hard line there might seem stark next to the soft design of the border print, so I opted for a brown and cream stripe, cut across the stripes. Only about 1/2″ will show. With that, the center finishes at 30″.

20141222_151000

ugh. Terrible picture… Again the colors are so not real… The other pix show them better.


At this point I could go back to the design as shown, beginning with the unpieced green border called Border 1 in the design post.

Instead, though, I’ll make a 6″ border of variable stars and an alternate block. Not sure right now if I’ll make hourglasses or puss in the corner blocks.

I’ve started on those variable stars, cobbling together scraps for the pale backgrounds. Scrap quilts take a lot more time, if you use scraps as I do. (Post on that coming soon!) But they do make more interesting quilts (another post!), in my opinion.

I hope your holidays are going easily, with minimal stress and cranky moods. And if not, I hope you have opportunities to escape enjoy some quiet time to restore your peace.