When I teach Medallion Improv!, I use a blueprint specifying the size of the center block and the widths of each border. This frees the student from concerns about those proportions, allowing them to focus on other aspects of design.
Even with a blueprint, each student’s quilt will be completely different from every other, including mine. Each begins by creating their own center block. In so doing, they begin to define the style or theme of their quilt, from traditional to modern/contemporary, from casual to quite formal, from couch throw to heirloom to large wall-hanging.
I’m starting to prep for classes this fall. I’ve redesigned the blueprint to hone in on a couple of specific lessons. For example, using a center block on point requires knowing how to do that, as well as which blocks are appropriate for turning and which are not. Designating a border of half-square triangles demonstrates how many different ways they can be arranged, and shows how very simple blocks can be used to create a big impact.
I like to have at least a couple of examples of the blueprint quilt made, to show students varying ways to approach problems. Because this blueprint is new, I have some prep to do! I’ve chosen two center block designs to create two new quilts for class. One quilt will have a “traditional” feel because of the fabrics used, while the other will be from brighter, more contemporary fabrics. Both center blocks will be foundation paper-pieced. (I love knowing how to paper-piece!)
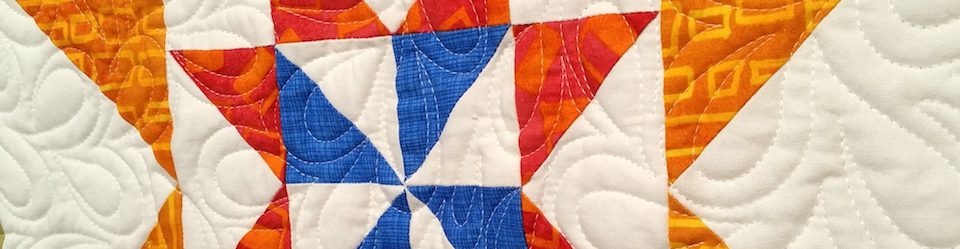
The blueprint’s center block is 16″ square, finished. (It could be no less than 15″ and no more than 16″ and still work easily. Smaller sizes would require some amendment.) Here is my first of two center blocks, already turned on point.

As you can guess, this is for the quilt that will be less traditional!
When turned on point, a 16″ block creates a center that is 22 5/8″. Because I used oversized setting triangles, when I trim it, it will finish at 23″. With a finished quilt top at 60″ square, the center, including setting triangles, is a little more than a third the width of the total. This gives a good proportion and clearly defines the center as the focal point. (See my posts on proportion, here and here and here.)
The variety of design elements in the star block create interest. (Note varying shapes, sizes, colors, values, and patterns. All of these are “design elements,” or the characteristics that add together to create the overall look. ) The lines in the fabric patterns, as well as the spinning star in the middle, provide a sense of movement that is both outward and rotational.
The colors reinforce each other, with the red and black in the outward stripes repeating the red and black of the pinwheel patches. The various oranges and orangey-yellows give depth, and also invite any other orange or yellow to join in. The dark blue of the star background isn’t repeated yet, but it will be in the first border.
The prints used, while emphasizing stripes, also include squiggles, bars, circles, and even floral. Having such a range in the center opens the door widely for what might come next.
The setting triangles are pieced from two different stripes. In truth, I had a hard time figuring the math to cut the orange squiggled fabric efficiently. So I didn’t. I just cut rectangles I knew would be big enough, and after piecing with the red and black stripe, cut the big triangles to fit the edge correctly. See my post on setting a block on point.
I have LOTS of stuff going on right now, so I’m not sure if I’ll work on this again next, or switch gears to the other class quilt, or … could be something else altogether. Either way, it was fun to make this block and I think it will make a big impact as the center of a quilt.

Beautiful!
Thank you!
That is a spectacular center block! I look forward to seeing what you do with it 😀
Thanks, Mary. I’ll work on it later today. We’ll see what happens! (I really don’t know yet!)
I have that Mary Mashuta book that I also bought second hand. And yes, keeping striped fabric going the direction you want can be a challenge, especially if you’re making multiples at the same time, like 1/2 square triangles. For your classes, are you going to show different designs that can come out of the same center block through the wonders of technology?
I’m not sure this answers your question, but what I’ll show is how the same sizes of components can give different designs. Each student will choose their own center block, not the same as mine. Could be an appliqued piece or whole cloth or something completely different pieced.
I especially appreciate seeing the thought process behind designing a center block. And this block looks good.
Thanks for taking a look!
Before I read a word, I looked at the image and thought “pinwheel.” Those plastic pinwheels where quite the thing when I was a kid. Mine was red, white, and blue. Of course the pattern carries the same name!
Yes, absolutely pinwheel! It’s one of my favorite shape motifs for quilt blocks. I don’t use it a ton, but it’s always effective. Thanks for taking a look.
A big impact, for sure! I love the very dark blue and the way it makes the star glow!
Thank you, Kerry! I have noticed a lot of photos of star blocks using the same idea, brights for the star and glowing dark blue for the background. It works well, I think.
Gorgeous star, perfect for the centre of a really impressive medallion quilt. I love how the star almost appears to be 3D….
Thanks, Kate. I love working with stash and having things turn out right. 🙂
It is gorgeous!
Have you done a post with tips on how to get stripy patterns to run perfectly parallel and perpendicular to the edges of the pieces and block, the way you do? Since I started out as a weaver, I am used to all my stripes automatically being perfectly in alignment with the selvages, and prints drive me crazy because they are often not aligned. I am very wary of using stripes in a length-wise direction and could use some pointers!
I haven’t done any post on that. When I do use stripes and their alignment is important, I cut based on the print rather than on the weave or selvage. All of the stripes used here have enough other things going on to distract from their imperfections.
I did get this book for Christmas (at a great used book store in Tacoma, WA) https://www.amazon.com/Stripes-Quilts-Mary-Mashuta/dp/1571200088
The whole book provides ideas for how to use stripes in quilts. Must dig it out …
Thanks for the kind comments!
Gasp. That is wonderful! You are the medallion queen!
Thank you, thank you! 😀