
Welcome to Catbird Quilt Studio’s Medallion Sew-Along! You’re not too late to join the fun. Parts 1 through 5 of the Sew-Along describe choosing the center block and four border sets. These and other resources can be found under the Medallion Sew-Along tab.
Now the instructions are all posted as linked above, and continuing blog posts will show you my progress. I’d love to hear about your medallion quilts, too. Drop a comment, give us a link. Show and Tell is always the most fun.
PROGRESS
When beginning this adventure, I started with nine center blocks. Six of them were Track 1, using a 15″ center and following directions for border widths. Three were Track 2, more free-form. In truth, I might not finish them all. But I’ll show you progress I make along the way.
Today’s progress report is on two tops that are completed. Both followed Track 1.
The first one used the center block I showed you in Make a Block with Me. Well, in truth it was a minor variation of that block, because it was the third or fourth one I made, and I was bored with it by then.

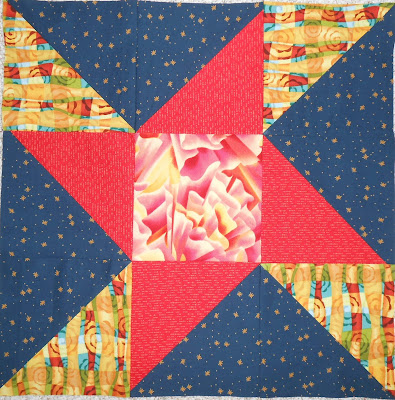
15″ center block. This photo shows the colors most accurately.

Block turned on point, and then framed to 24″

4″ border added
At this point, it languished on my “design floor” for two or three weeks. I loved the spikes of green but wasn’t happy with their background color. It’s a pale gold background with very fine red print on it. Of course gold and red are colors here, but it shows as pinkish from a distance, not at all what I intended. Besides that, I just couldn’t decide what to do next.
Finally I framed it with a narrow border of poison green. Then I was stuck again.
I wanted to use the cream with green circles again, and the wonderful red print in the very center. With just small scraps of the red, I had to get creative. I pieced patches together from scraps. I like the way the squares on point form a bead necklace around. Another thing that works for me, considering the size, is framing it very simply as the last border. If the top were going to be much bigger, another pieced border would be better. As it is, the top finishes at 52″.

The 2″ poison green border with gold corner blocks was followed by the red beads on a pale background, repeating fabrics from the center. The final border is another 2″ green strip, this time with red corner blocks. Finished size is 52″.
The second top began its life as a bursting star.
Another 15″ center block. I didn’t like the center patch — too pink, so I changed it.

Note the different center patch. First border set added 1.5″ blue and oranges on angle, and then the 3″ blue stars. Second border set added a checkerboard of oranges and navies. All the navy fabrics have stars.

I changed the center patch again! Third border set was 2″ of blue followed by 6″ friendship star blocks. Final border set repeated the orange and blue checkerboard, framed by navy to contain all those stars!
I’ve named this quilt “Oh My Stars!” It finishes at 60″. In my opinion, it’s kind of an odd quilt. It’s brilliant to look at with the stark color contrasts. It’s also a little different for me, in that it really only uses two colors. That said, I really like it!
WRAPPING UP
Next week I’ll post another progress report. I’m working on a third top using the 15″ center. This quilt will be LARGE and a little more complex than the first two.
Until then, I’ll look forward to hearing from you. Any questions, comments, great ideas, news about progress, you’re always welcome to stop by and share.

Pingback: Donation Quilt | Last Call For Offers – How I See It
Pingback: Oh My Stars | Quilt Donation – How I See It
Pingback: Bathing In The Summer Lights | Riddle and Whimsy
Your medallions look great! Here is a blog post including mine so far. Flying geese border is on and a narrow navy blue follow up border. Now trying now to get my pinwheels border sized right and on. I keep plugging away at it and sooner or later it will be what I hope! Happy so far but getting tired of making pinwheels! LOL
http://myall2.blogspot.com/2013/11/quilts.html
Kathy Aho in MN
I LOVE the flying geese border! What a great way to move toward more square.
I’m working on a (too long) blog post now, hope to put it up tomorrow. After that I’ll add another post specifically to point to yours. I can’t wait to see all those pinwheels in place! 🙂
A Medallion quilt is on my list of “must dos” and I can not believe you have two beauties done. You have inspired me.
Thanks! Your work is beautiful, too.
I actually have a number of medallions done and more in process. I guess they’re my “thing.” What I love most is I get to keep designing until they’re DONE. The fun continues!
Love your quilts Melanie. Both are wonderful. I need to go to the beginning of your Medallion tutorials and “catch up”.
Hi Pam! So good to see you. Thanks for looking.
Hope you are well. 🙂
I totally get why you’re in love with that red print in your first top. The reds and greens are nicely balanced without being at all Christmassy. And on point settings add so much punch. And I’m glad you changed the color of the center piece in your second top. That’s a hard decision once you’ve started sewing everything together. Blue and yellow/orange is a great color combo. Love the checkerboards. Did you try surrounding your inner border stars with only dark blue squares?
I didn’t try that but it might have worked a little better. That’s the only part of it I’m kind of unhappy with. And yes, removing the center TWICE!!! and stitching new ones in… I felt a little crazy about that but am glad I did.
Thanks for the comments on the red/green one, too. I really didn’t want it to look Christmasy and am glad it doesn’t come across that way. I have very very few holiday prints in my stash, and those that I have are pretty subtle. Not sure there are any in this one.
Thanks for taking a look. I appreciate your comments.
They look great! Can’t wait to see the others!
Thanks! I’m SO excited about the one I’m working on now. And I know who it’s for, which makes it more special. Don’t tell… Son’s best friend, when he finishes his PhD in a couple of years…
🙂