Welcome to our Medallion Sew-Along! I’m pretty pumped to begin this project with you. Just follow this blog for updates if you’d like to join the fun!
While I love all quilts, medallion quilts fascinate me for a number of reasons. They’re one of the oldest formats of bedding quilting, and I love the history behind them and the huge range of styles they can take. Aesthetically, the variety of borders makes them exciting, while the symmetry appeals to me, too.
But medallions are unique in the method of design, too. Think of a basic block-format quilt, or even a strip quilt. You might choose the sashing fabric or border styles after you’ve started, but you probably already have in mind what blocks to use, how many of them, and whether or not you’ll set them on point. Much of the design process is done before you begin stitching.
With medallion quilts you can stretch the design process throughout construction. This gives you tremendous flexibility to make a quilt unique to you.
WHERE DO YOU START?
First you need to consider a few things.
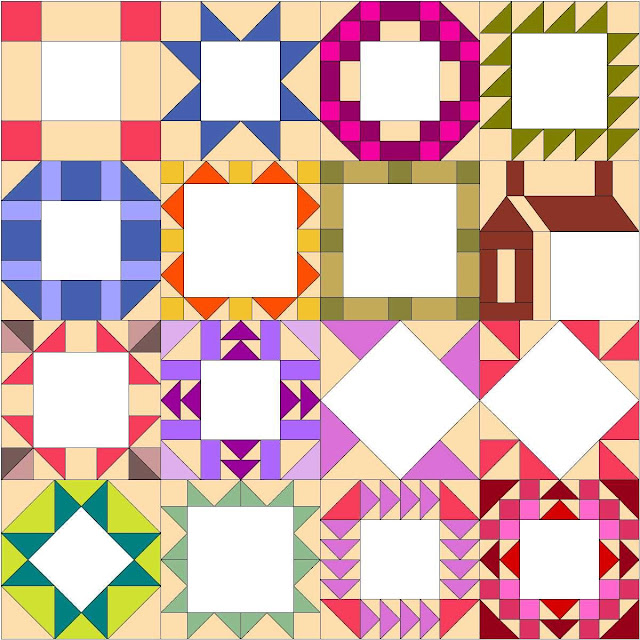
Is there a specific center block you plan to use? If so, that will drive many of your decisions as you go. If not, here are a number of centers that may inspire you. Also I’ve provided instructions for making a 15” block, and you’re welcome to use it as your pattern.

Don’t worry if these colors aren’t for you! Imagine it in contemporary fabrics, or brights, or baby pastels. You get to choose!
Will the quilt be a gift? Do you need to please someone else or just yourself? Colors and size, and even blocks used may be influenced by this.
How large do you want it? Will it be a wall-hanging, a baby quilt, a bed quilt? Is a square quilt fine (simplifying design,) or must it be oblong?
What colors/fabrics will you use? Are you busting stash or will you buy some new? Are you comfortable with scrappy and improvisational fabric choices? The tradition of medallion quilts allows incorporating “new” colors and patterns clear into the last border, as long as they continue to relate to what’s gone before. If you’ve already chosen a center (or have a plan for making one,) you may want to pull fabrics that might work, knowing that others likely will be used, as well.
THE CENTER BLOCK
How big should it be? When I study “successful” medallions (meaning, ones I like,) the center block is about a quarter the width of the whole quilt, or even larger. A smaller block tends to lose its importance when the scale is less than that.
For example, if you have a 15” block, your quilt might be up to about four times that, or 60” wide, while keeping the central block thematically important.
 What if you want a larger quilt? Well, you could use a larger block, or you could increase the scale of your block by turning it on point.
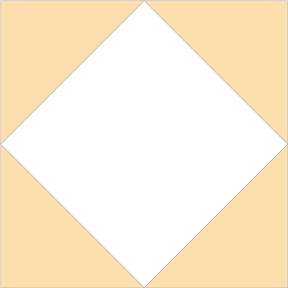
That same 15” block, if turned on point with an exact (not over-large) setting, creates a block that is 21.21” wide. How do I know? Using the math for diagonals,
15 x 1.414 = 21.21.
Using a block about 21”, you can make a quilt up to about 84” and still have the same proportions.
(If you make the setting triangles “too large,” you can increase that more. If you decide to do this, you’ll want to think carefully about scale and how the block may “float” on the setting. If the block’s design is too far from the edges, it again may seem too small.)
 Another way to make a block larger is to make it the center of a bigger block. Rather than turning on point with setting triangles, as above, you could frame it with the outside piecing of a larger block.
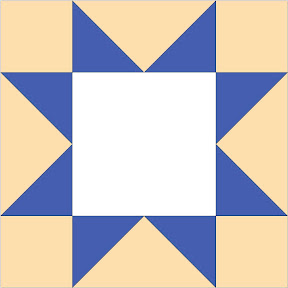
To the left is a basic variable star block, with the center left blank.
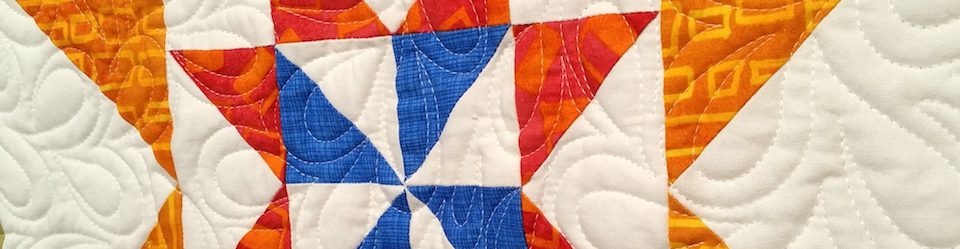
Imagine your block surrounded by star points. A variable star would double the size of your center, as shown in the photo below.
The little star below is framed by the bigger star, which could turn an 8″ block, for instance, into a 16″ block.
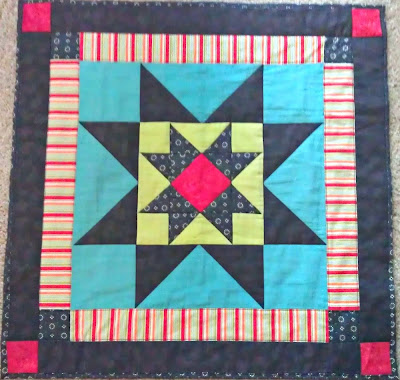
But there are any number of ways you can use your block as the center of another. Here are just 16 frame blocks I found in EQ7! This may be a little hard to see, because there are so many and all so different. But the idea is, you can frame your chosen block with any one of the bigger blocks below to expand it and make it more substantial, just like I showed with the little mock-Amish wall-hanging above.
Do you have a block? Have you thought some about your goals? Great!
TWO TRACKS TO THE PROJECT
Track One
First, using the 15” block linked above, I’ll provide border designs for four or five concentric borders. Or you can use any other 15″ block if you prefer. I’ll draw these for you in EQ7 and will help with sizing, but I’ll depend on your experience rather than describing each step of cutting and stitching. For some borders I’ll give multiple ideas for your next step, so you can build your unique taste into your final quilt.
Track Two
For those using center blocks that aren’t 15” finish, I’ll help you develop strategies for your own design. There are a lot of design problems that can come up, but there are a lot of potential solutions to deal with them, too. The fun is wrestling through the options to come up with a solution that pleases you.
For both tracks, I’ll take you out through four or five borders. Since I design as I go, I don’t really know how many! But I encourage you to make as many as you need until your quilt is “done.”
I plan to post MSA (Medallion Sew-Along) updates every other week. I hope you’ll comment, question, and give links to your photos! (Remember links to photos in the Stashbusters folders won’t be visible to non-members.) I want to hear about your progress and challenges.
Between times I’ll continue to blog about quilting in general and medallions in particular, so join me regularly to see what we’re up to.
The next official MSA blog post is scheduled for August 29. In the meantime, choose or make your center block. Make sure it is squared up and ready to go. Pull some fabrics you might use with it, with a range of colors and values. But don’t get too far ahead of yourself! Leave room for serendipity, and
Enjoy the process!

oops, sorry posted on another posting:
Finished my center block – I am thinking that the next couple of rounds will have to be a little more subdued. Thoughts?
You can see it on my blog spot: http://2busyhands.blogspot.com/p/medallion-quilt-sew-a.html Shirley
I think it’s lovely, and will make a wonderful quilt, something to be treasured.
As to busy, the piecing is not too busy or need to be subdued. One thing I found, though, with the commissioning quilt was that the fabric patterns (stars) vibrated some. I would have liked it better if there was less of that.
You can see it under the Gallery 2013 tab, here.
Does that help?
Yes, thanks. I am going to wait to see what comes next before I make any kind of decision.
I am excited to play along. I am also a design-as-I-go person and hope to learn some techniques to make those borders fit what I need. Thanks for sharing.
YAY Jean! Thanks for coming along for the ride!
I love your “About Me” statement on your blogspot. I think you are writing about ME!
Thanks again.
Melanie, is it possible to do the medallion sew along with a center rectangle or should I stick to the square for the first one?
Yes, you can use a rectangle. Then you’ll decide whether to keep that aspect, or frame it to square and go from there.
Oops, think I sent the administrator link to my new page – the public one is:
http://2busyhands.blogspot.com/p/medallion-quilt-sew-a.html
That one works! Thanks for updating it. I think the cross-stitch eagle will be really beautiful! Thanks for joining in. I hope everyone has a lot of fun.
Pingback: GETTING BACK INTO THE ZONE | Lucie The Happy Quilter's Blog
Going through my “orphan” blocks container to get me started. You have given me great information to get started. Thanks again for leading us through this fun challenge.
My pleasure! I’m having fun, too. I’ve been downstairs today making MORE of those 15″ blocks in a variety of colors and styles. To tell the truth, I’m still moving through some quilt therapy, and it’s good to feel excited and joyful about quilting again. 🙂
This sounds like fun. It would be like doing a round robin all by myself. I have many orphan blocks that I could choose from. I am going to take out that box and see what I find.
It’s JUST like doing a round robin all by yourself! That’s the best way to look at it. For each round you just have to deal with what’s gone before. Sometimes that means adding an elaborate border and sometimes that means adding something very plain. Thanks for joining, Mary K!
I hope to play along, I want to make a gift quilt for my husband for his recent retirement from cottons or flannels with an outdoorsman theme. The center will be a large pre-made cotton panel that has a lake scene from a MN boy scout camp he used to go to when he was young. Not sure how this will go as I am thinking make one side with the outdoorsman flannels and the other side cotton panel and cotton blocks? The flannel and may be a bit unruly but he is not fussy so this will be a good quilt to try this method. I think this means I might be making a reversable style quilt with this panel medalion on one side. Here is a pic of the Camp Wilderness panel https://encrypted-tbn1.gstatic.com/images?q=tbn:ANd9GcRV4Wm5dpb4b_cF-3Ld30N6hldfc1J46gTOTg-pX2k79yNKgsLA
Kathy Aho in MN
That’s pretty! Certainly one way to do reversible is to use big blocks, 10-20″ inch squares or even rectangles as the backing. I’d love a flannel back like that. Not sure if that’s what you mean though. If not, let me know.
It will be fun to watch the progress on yours as you build it out. Thanks for sharing the link.
A pillow panel would work too. I don’t have any so will use a block.
This sounds like fun.
Yes, I have a great pillow panel I might use. And I’ve been downstairs touching all my stash, picking fabrics for several more samples. 🙂
I love your idea and the panel you have selected.
Su, Quilting in Michigan
I have 3 centers ready..12″ x 12″..20″ x 20″ nd a 28 x 28..will I beable to work with these.. love all 3..help me make a decision..Thanks
Hi Barbara! You can work with any of those, but you’ll have to pick which one! If you’re looking for “simplest,” you could use the 12″ block, frame it out to 15″ finish, and then follow along with those plans. If you’re more adventurous, any of them will do.
Thanks for joining us. 🙂