A few days ago I was asked how to calculate the size of setting triangles for an on-point setting. I thought a post focused on that would help others, too.

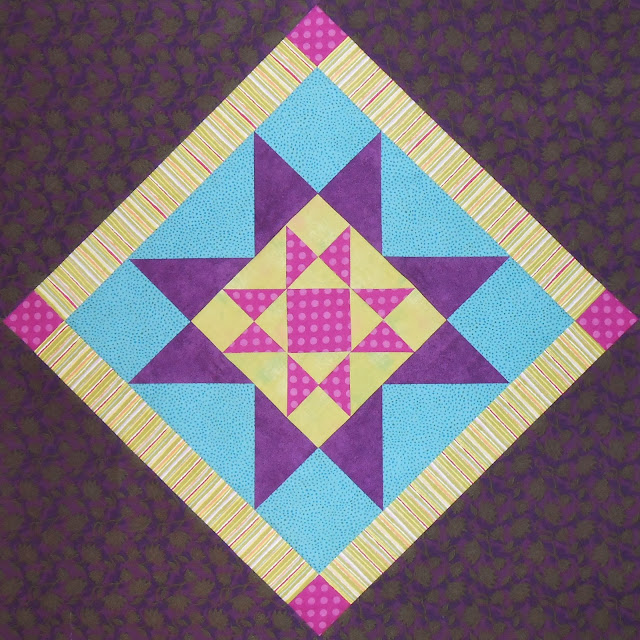
Center block set on point, and framed with a narrow border.
[For information to help decide whether to set your center block on point, see this post.]
Have you ever made a block-format quilt with a diagonal setting? The math for setting triangles is the same as that for the setting corners on that block quilt.
How large will your new block be?
finished center x 1.414 = finished size of on-point block
ex: 20″ x 1.414 = 28.28″.
finished center + 0.5″ = unfinished size of center
ex: 20″ + 0.5″ = 20.5″
(finished center/1.414) + 0.875 = size of square to make TWO corners
This assumes PERFECTION. I do NOT assume perfection! Round up at least a half inch.
ex: 20/1.414 + .0875 = 14.144 + 0.875 = 15.019, or about 15 1/8″.
Now round up to 16″.
CUT two squares 16″. Cut two because you need four corners.
CUT each square in half on the diagonal.
To attach the setting triangles,
PINCH the center of the long side to make a crease.
PINCH the edge of the block at the center.
MATCH the creases and pin.
SMOOTH the triangle across the edge, careful not to stretch it.
PIN generously.

Smoothed, not stretched! Pinned generously.

Notice that the triangle is over-sized, so I will trim the “ears” off before attaching the 3rd and 4th sides.
REPEAT for the opposite side.
SEW with a 1/4″ seam allowance.
PRESS toward the triangles on both sides, and trim the dog ears.

Two of 4 sides on.
REPEAT for the remaining sides.
TRIM, leaving at least a 1/4″ past the center block’s corner.
It is over-sized before trimming, because these instructions make it that way. You can either leave it over-sized, letting your center block “float” in it, or you can trim to a more exact size, with 1/4″ seam allowance to match the points of your original block. Either way you will need to square it after attaching setting triangles.
Also, the larger your block, the harder it is to manage trimming. It IS doable! But it does get more difficult.
Here is my finished block, turned on point and ready for borders. So far it finishes at 28.25″.

Wow! It’s been 7 years since 6pu posted this so I’m very glad I found it! I love this block and your instructions are spot on. I wanted to have a 17″ block so I had to do the math but your formula worked out great! Thank you so much. I’m no longer afraid to make this block. Lol
Thanks for directing me to this post Melanie, very informative and the Quilt top is just fabulous but then again anything that has purple is fabulous to me 😉
It is a favorite of mine. I like the simplicity, especially. I’m glad you found it helpful.
Forget the math! Get Donna Thomas’ “On Point Ruler” It is absolute genius. NO MATH!!! So it makes the blocks perfect and you get to keep your hair.
No. One of the primary goals of this blog is to help build power. You don’t get more powerful by giving up your abilities to more tools and gadgets. The math isn’t hard. And unless the ruler is enormous, it won’t work for large squares, like 36″ or larger medallion centers. The math works no matter what size you need. Math is more powerful than the ruler.
Good post Melanie…you provided us with some great information. Yep, something we can all use.
Glad to do it. Thanks for taking the time to read and comment.
And I like the star block and color choices. A bit bright, a bit bold and quite striking.
I finished the top today and I LOVE it! 😀
Thanks.
Thank you Melanie for this tutorial. Very easy to understand. Will bookmark this page.
You’re welcome. I hope it helps.
this was a great post..
a keeper…Thank you for sharing your knowledge with me/us…
Take care….You Matter…
)09
maryrose
Thank you, maryrose. I enjoy teaching, partly because I learn so much when I do.
Thank you!! I always forget the math and have to go hunting! I will be bookmarking the page of your blog!
You’re welcome! I have a particular book — I’ve memorized the page number — that I look to. But as with everything else, when you teach, you learn. I’m hoping I won’t have to look it up anymore!
🙂