It’s way too easy to spend way too much time poking around the internet. We substitute digital life for real life, digital people time for real people time. (Oh my, there are essays I can write on this!) Often we gain big ideas while losing time to implement them. We measure our own abilities and accomplishments against the best things other people can do. Remember, they only post their best stuff! And if they post great stuff all the time, remember that in real life they have lots of problems, too. They may even be horrible people!
… a little off my intended topic …
Yeah, we can waste a lot of time online, but there are some pretty great things out there, too. When’s the last time you said, “I can look that up!”? If you’re like me, you say it, at least to yourself, many times a day.
One of the great resources I use frequently is Electric Quilt 7, the premier design software for quilters. I’ve barely scratched the surface of its functionality. You can design blocks or whole quilts, print patterns for paper piecing, calculate yardage, and more. (It lives on my computer, and is not web-based.)
You know I love medallion quilts, and I design as I go. In other words, I plan one border at a time, rather than trying to envision the whole quilt. Even with that, EQ7 has helped my process. When I was building my own medallion quilt, I got this far and got stuck:
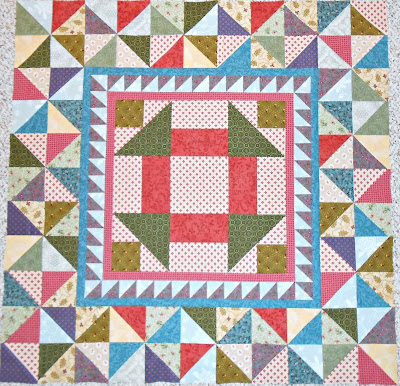
Center through broken dishes. Now what?
I decided I wanted to make a gazillion 6″ churndash blocks and set them on point. A 6″ block on point measures 8.5″, so I needed to create a spacer that would let me use whole blocks all the way around. I also wanted to repeat the cream with pink dots used in the center block. So I designed as far as this border:

Adding the striped border took the top to 42″. On point 6″ blocks measure 8.5″. 8.5 x 5 = 42.5, but I figured I could fudge them with fat seams and make it work.
After I made about 20 of the 24 churndash blocks, I finally laid them out around the center and hated it. They were too busy, too intricate, and there were color problems. Since I didn’t want to make the same mistake, I turned to EQ7 again. I ended up with this:

Simple 4-patches with the bead of yellow around. Puss-in-the-corner blocks in the corners allowed the yellow to turn the corners. These 4-patches were 4.25″, so on point they measured 6″. 6″ x 7 = 42″. I needed 7 blocks on each side.
That worked fine, but the top wasn’t finished. If I’d stopped with that border, the quilt would have showed as turquoise. Instead I wanted to pull the pink and green back into more prominence. I tried a couple of different border designs, but I thought they were too busy.

I like it in some ways, think it’s too busy in others. It’s a good idea for another quilt, though!

This is simpler than the previous, but I still wanted it to look a little more airy.
And I ended up with this. It uses four of the churndash blocks and finishes with a purple border and teal binding.
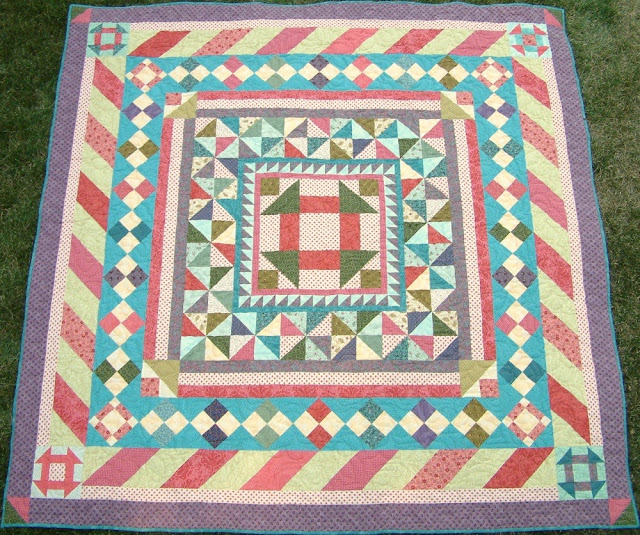
Finished!
You may wonder, what about those online resources? What about “I can look that up!”? A couple days ago while I was looking something up, I found this. It’s a link to EQ7’s tutorial on designing medallion quilts. I’ve figured out a lot of this stuff on my own, but there are some great things in here I didn’t know.
One thing is a Variable Point function, to design medallions with on-point centers in another way. From the tutorial:
When should I use On-Point?
Use QUILT > New Quilt > On-Point
when you know the edge length of the on-point blocks. The majority of quilts with on-point blocks will be this style, because you know the block size. Example: If you’re doing a Block of the Month and you’ll have twelve 12.000” finished (12.500” unfinished) blocks at the end of the year, you would start a new On-Point quilt and set the block size to 12.000.
When should I use Variable Point?
QUILT > New Quilt > Variable Point should be used under two circumstances:
1) …when you don’t care about the block size, but you do care how large the block is with its setting triangles. (Variable Point figures horizontally and vertically, more like a Square in a Square. You care about the square, not the diamond inside.)
2) …when you want the diamonds to be skewed.
So imagine if you have a fabulous piece of fabric and want to use it as your center, whole-cloth. You don’t need to worry about the size of the fabric the way you would a pieced block. Instead you can specify the size WITH setting triangles.
There are other cool things, too. The tutorial shows how to make “skewed” designs, rectangular or stretched centers with great borders around.
All this makes me realize I don’t use EQ7 as fully as I could. It is one more tool already in my tool kit. A little practice on these skills might strengthen my design process more.
Sometimes, the time we spend online works to our benefit, especially when we translate those digital world inspirations to real world implementation.

I liked your post. I use EQ5, I’ve had it for a while. I have designed a few quilts, I have finally designed a quilt that other want 🙂 I just need help learning how to publish my quitl. DO you have any ideas where to start or of any good software to help with getting my ideas on “paper” for others? Thanks. I look forwatd to following you.
Thanks very much! As far as publishing your designs, I guess it depends on what you mean. Blog publishing the layouts from EQ7 is easy. I can “export” an image to a jpg file. Then I load that into my blog post like any other picture. But if you mean pattern writing for sale, I don’t know much on that, as I’ve never done it. Sorry I can’t be more help on that.
Thanks again for taking a look, and for following.
Thanks for your comment! We are selling fabric and I have designed sample quilts to go with the fabric. Some people have expressed interest in the “Pattern” that “goes” with the fabric. That’s what I need to learn more about, not publishing for sale, at least, at this point. Thanks Again!