
I’ve often boasted about not having many UFOs (UnFinished Objects, or quilt projects that haven’t been completed.) Why that would be something to brag about, I’m not sure. But it’s true, usually I finish what I start.
There is one long-time UFO, started several years ago.
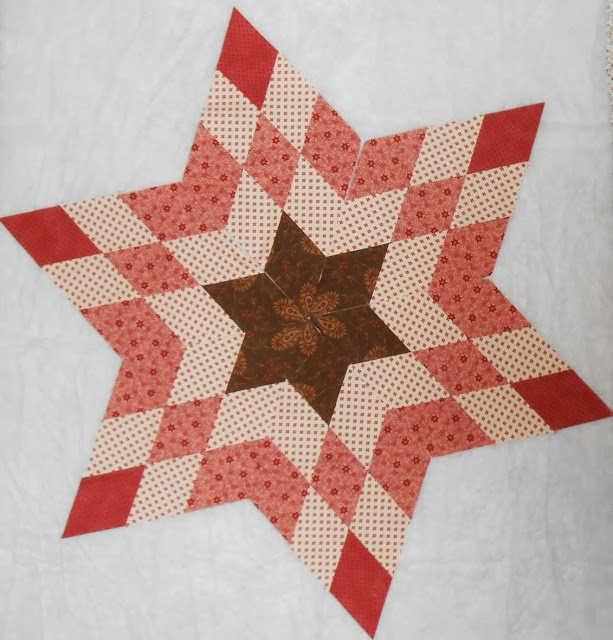
There were multiple reasons for not proceeding with this. One issue was technical — I wasn’t sure how to do the Y-seams to set the points in a background. (Above they are not sewn together, just arrayed on batting to show them.) Another was that, once set, I didn’t have a good idea of how to show them off.
Almost four years ago I posted More of an Idea than a Plan. In it I showed one option for setting these star points.
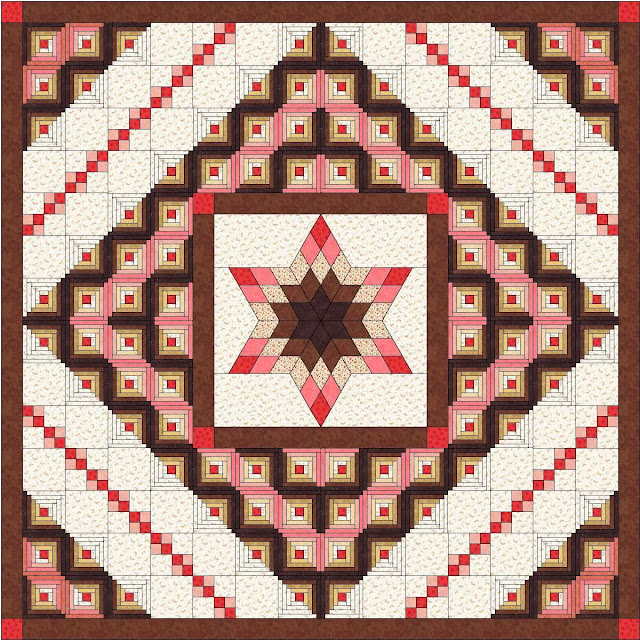
I didn’t do this. I still like the idea, but I’m really not interested in making those log cabin blocks. Also, it turns out that the center resulting from the star points is bigger than I thought. Adding all those log cabin borders would make this a fairly humongous quilt. If that weren’t enough, I still didn’t know how to set the star points in background fabric.
Recently I got the star points out again. It turns out you can avoid using Y-seams if you extend the points with background fabric. The blue lines below illustrate the extra seams. The star block has six big segments, each consisting of a star point and two pieces of background fabric. Put together two star halves, and then stitch the long seam to create the whole block. Easy peasy.

The constraint I faced was not having quite enough background fabric. If you look again at the block above, you can see that the star itself is not the same width as height. The star points do not extend all the way to the sides. To make the block square, it requires “enough” background fabric to make the height and width equal. I didn’t have quite enough.
That gave me the next opportunity for problem solving. The easiest two ways to make a center square are to 1) trim it to square or 2) add borders to make it square. I had nowhere to trim; adding borders of different widths was the best choice.
The photo below shows my solution. To all four sides, I added borders of floral print on cream background. The top/bottom borders are narrower than the left/right borders.
The one-inch strip border in coral encloses all that and creates the illusion of uniformity. At least, for me it helps make the width differences disappear. That strip takes the center to 42″ finished.
The final border so far uses 4-patches on point for the edges, and broken dishes in the corners. I’ve talked before about using “easy” widths for borders, to make them divide into square blocks. This works even with blocks on point. With an edge of 42″, I divided it into 7 equal segments to have a 6″ border. 42″/7 = 6″. Then I used the math of diagonals to find the correct block size. 6″/1.414 = 4.25″. Each of the 4-patches is a 4.25″ block. When set on point, they make a 6″ wide border.
It isn’t magic, and it isn’t mysterious. It’s just math. If I didn’t know all that and still wanted to use blocks on point, I could have made them any size and simply had them not fit perfectly. AND THAT IS OKAY!! And TRADITIONAL!!
Alrighty. This post is too long already. I’ll finish it soon with showing you a couple of options for the remainder of the quilt layout.

Thanks for showing how to set that star without Y-seams. I have an abandoned lone star in my UFO so this will come in handy when I decide to revisit it. My head is spinning just looking at all that log cabin…it’s really lovely to look at though.
Hi Sola. Yes, I love to look at log cabins, and likely someday I’ll make one. But not this one. 🙂
Looking good! I’ve never been happy about the 6 points coming together in the center, though. Yes, I’ve done it recently and it gets better with practice, but UGH!
Thanks. It turned out okay, not quite as flat as I wanted… But the points came together fine. All those seams were pressed open, so it didn’t make too big of a bump.
This is heading in a good direction. Looking forward to seeing more.
I’m actually on vacation right now, which gives me time to mull over options. I’ll post a couple of them soon. Thank you!
I love the idea of extending the seams instead of doing the “Y” seams. Useful tip!
It worked quite well. Thanks!
The original was cool but I love what you ended up doing with it. You are the Medallion Queen (bowing). Awesome! 🙂
More to come, dear Tierney! Thanks much. 🙂
Love the problem solving. Particularly getting around the “Y” seams – adding the background to the diamonds is a great way to do that.
I used background extensions when I made the Ricky Tims kaleidoscope quilt. It has 12 points, not just 6. And I’ve seen them used to make Lone Star/Bethlehem Star quilts. I knew it could be done. I’m glad I finally made the leap. Thanks for commenting.
🙂
You’ll like the plan. 🙂
Beautiful, great design
Thanks, Patricia!
I love the trick of extending the points with background fabric. Y-seams may not be impossible, but they are definitely not among my favorite things. Lovely solution for your UFO.
Thank you. I honestly don’t know why it was so hard for me to figure out. I knew it would be easier to make in different segments, but I had to really spend some time looking at them to see quite how. Now it seems easy!
This a fine example of why quilting is good for the brain! All that math and problem solving. Making the borders different widths is brilliant, I’ll tuck that idea away for another day. I, too, would have avoided all those log cabin blocks. I have a quilt kit for a big log cabin quilt but can’t bring myself to start it….maybe I’ll do a star instead!
If you love the fabrics in your kit, you can use them for anything you want! Thanks for taking a look.
I would’ve loved to have seen this with the log cabin blocks–I’ve always loved seeing them set this way with the color changes–but I do understand what a drag it would be to sew the blocks!
It is a really impressive look! I think if I started on the blocks, it would stay a UFO. 🙂
Mercy, what a job all those log cabins would have been. I love the original design, but life is too short and you probably didn’t need or want the quilt it would have become. I didn’t notice the different border widths until I read through the process, and I still think it’s fairly ‘invisible’, so good job there.
Thanks, Kate. You’re right, the design above isn’t really for me. And log cabins — I love the look, but I’ve never felt very inspired to make them!