Fooled ya, huh? It’s actually “four calling birds…” The geese don’t come in until later, when there are six geese a-laying…
One of the reasons I love flying geese blocks is they can be made almost any size. Blocks that are on grid are less adaptable for sizes. For example, regular 9-patches are on a 3-grid (3 rows by 3 columns) and are most easily made in sizes that multiply easily by 3, such as 6″ finish with 2″ patches, or 7.5″ finish with 2.5″ patches. For a harder one, bear’s paws are on a 7-grid, so are most easily made in sizes like 7″, 10.5″, or 14″. But geese are ungridded. The flying geese I need finish at 8.25″ in length. That’s a weird size, but easy to make. (Half-square triangles and hourglass blocks also can be made any size.)
There are a variety of ways to make geese, but I only use two of them. One is the stitch-and-flip method. With this, the base (goose) is cut the size of the finished block, plus 1/2″ each direction for seam allowances. For example, if you want a block that finishes at 3″ x 6″, cut the base as 3.5″ x 6.5″. The background (sky) is cut as two squares, both half the length of the finished block, plus seam allowances. Using the same size block, cut two pieces that are 3.5″ square. Pat Sloan shows how to put these together to make a perfectly sized flying geese unit.
The method works great. However, you do have waste triangles of fabric cut off. Some people make good use of them and convert them into half-square triangles for other purposes. I do not. For small flying geese, throwing away the waste doesn’t bother me much. For larger ones, it does.
The other method I use is the four-at-a-time method. Why choose this one? The process allows more efficient use of fabric, because there are no waste triangles. For me, the disadvantage is I have to be more careful of my seam allowance. To adjust for that, I check sizing on the first set I make. If I need to trim slightly, that means I need to use a slightly bigger seam allowance, perhaps only a thread width bigger. Even so, it’s a great way to make a lot of geese quickly and with no waste.
Here is a video that clearly explains the process, as well as a link to another set of instructions from Connecting Threads.
For each FOUR geese units, use 1 large square and 4 small squares.
Large square = finished length of unit + 1.25″
Small square = finished width of unit + .875″ (that is 7/8″)
Example: for four flying geese units finishing at 3″ x 6″, cut 1 large square (the geese) at 7 1/4″, or 7.25″. Cut 4 small squares (the sky) at 3 7/8″, or 3.875″.
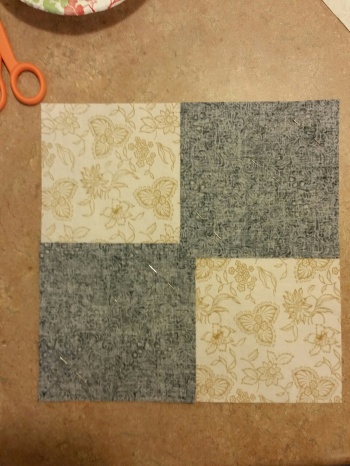
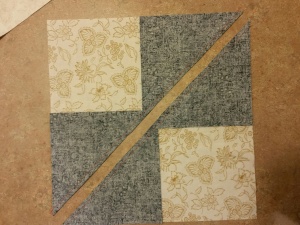
Draw a diagonal line across the wrong side of each small square, corner to corner. Arrange two of them right sides together in diagonally opposite corners of the large square, with the drawn lines meeting in the middle. The small squares will overlap a little. Pin them in place.

Stitch from corner to corner, a scant 1/4″ away from the drawn line. Then turn around and stitch the other direction on the other side of the drawn line.
Cut on the drawn line between the two stitching lines. The video shows using the rotary cutter and ruler, but scissors work fine.

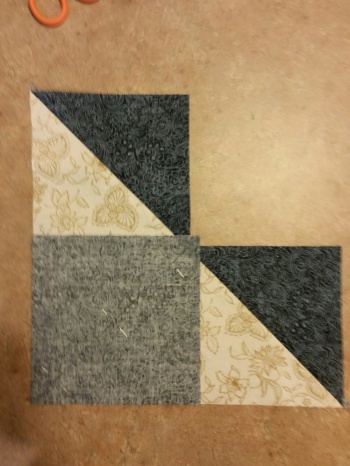
Press toward the sky squares. You end up with two pieces shaped sort of like a heart.
On each of those pieces, pin another of the small squares with the drawn line running from the corner through the “cleavage” of the heart. Sew 1/4″ from both sides of the drawn line, as you did before. Cut apart on the drawn line, and press toward the sky triangles.
What is the difference in fabric used for the two methods? I needed 32 flying geese units with finished measure 4.125″ x 8.25″. To make FOUR units this size:
Stitch-and-flip requires 4 (units) x 4.625″ x 8.75″ = 161.875 square inches of the base fabric, and
4 (units) x 2 (per unit) x 4.625″ x 4.625″ = 171.125 square inches of the sky fabric.
Four-at-a-time requires 9.5″ x 9.5″ = 90.25 square inches of the base fabric, and
4 x 5″ x 5″ = 100 square inches of the sky fabric.
For this size example, stitch-and-flip requires almost twice as much of each fabric, compared to the four-at-a-time method. For 32 of them, that’s almost a half yard difference for each fabric. I don’t always have that much more fabric available. Note that different sizes of flying geese will have different outcomes on this calculation, because of the proportion of the seam allowance compared to the rest of the unit.
One more alternative is to create the effect of flying geese using half-square triangles. Instead of 32 flying geese, I could have used 64 half-square triangles. I chose not to do this because I wanted the toile of the base fabric unseamed.
Do you use flying geese in your quilts? Do you have a favorite way of making them? Questions or comments?


I’ve tried both the stitch and flip and the 4x geese. Like both, and especially the 4x geese, and I get more at one time, or at least I think so. Saying that…if I’m sewing and forget, I find myself doing the sew and flip. When I use this method, yes, lightly starching the pieces helps immensely.
For the past two weeks I have daily tried to make flying geese (one struggle per day is enough) where the point isn’t cut off or the point seam is so narrow it would easily fray. Starching the fabric has helped some. Have tried the old-fashioned way of one triangle and two half triangles on each side (too wonky), Quilt in a Day method (seam too narrow at point). Tried this method about 5 years ago and they were badly out of shape (maybe will try again with starched fabric). Next I’ll try the flip and sew method. Learning to do this easily to make a lot of Sawtooth Stars is on my bucket list and at this age I don’t dare wait too much longer to win this battle. Thanks for your squaring up input to remove some of the off-kilter look that is happening.
The stitch and flip method gives a very accurate block, because you use the base as your template when pressing the corner back. Why don’t you give that a try. When you do need to trim, there are a couple of things. First, usually trim from the base, not point. Also, usually you don’t need to worry about how centered the point is, so it should not matter where you trim side to side. Hope this helps a little.
Thanks for your idea of trimming from the bottom. That plus being on a base should work. 🙂
Love flying geese! But of course, I love wonky ones best 😉
I would guess you could make them wonky with this method, too. hmmm…
If I ever make flying geese, I hope I remember to come back to this post and try both methods!
Just ask me and I can point you to it. If you ever make flying geese… 🙂
At this point in the year I am wondering if I am ever going to make any textiles ever again. We have been working on outdoor projects and the sewing room is empty and abandoned. 😦
It will still be there, ready when you are.
I use the flip and sew method; for some reason the four in one method never is true to size for me. I love using the bonus triangles as leaders and enders. Sometimes I make them immediately into pinwheel blocks, and then they quickly find their way into a quilt top; other times (like now) I save them for a future mystery project.
Yes, it’s a lot harder to get the 4x the right size. I did half of them before I felt like I could quit checking. I don’t mind trimming if I have to (and in this case it made sense.) But I’d sure rather make blocks the right size in the first place!
I like the four at a time method for making flying geese, I’ve been using it this week to make the flying geese units in a variety of blocks to surround a central panel. Thank you for your clear explanation and handy links.
I think some things are really hard to explain well. The videos above both are very clear. But for me, it ALSO helps to have the basic math written out to see!
One thing I haven’t done is make geese of a lot of different combinations. There is no big reason all the small squares have to be the same. You could use 4 different ones to mix things up. Do you every do that?
No! I have this symmetry thing going on! I’d happily make a row of geese from different fabrics but each goose would have to have it’s own matching squares 🙂
I must confess, my favourite flying geese patterns are mostly paper pieced, which eliminates any possible (likely!) wonkiness. I like the HST version too, where you stitch a dark to a light square on the diagonal and slice between two lines…
I’ve found that wonkiness of centering is not very important. Size matters of course, but there are ways to fake that, too. Trimming when needed usually should be at the base, not at the beak or point. If you need to trim the sides, it often doesn’t matter if you center the point, because usually the point doesn’t line up with anything else that shows its off-centeredness.
I don’t know what you mean about the HST version. Do you have a link or maybe can you explain differently?
I can’t find the link, I thought I had it saved to my Tips & Tricks Pinterest board, but not… I’ll keep looking. It’s a lot like the four at a time version.
Cheese whiz! I learn something new every time.
Me, too! 🙂