
Yesterday I quilted Stained Glass Too, and today I attached the binding. I was reminded of when I started quilting and had no idea how to do binding the “right” way. For my first three or four quilts, I bought wipe bias tape binding, pinned it down, and stitched with a zigzag. It was not pretty, but it sealed the edges of the quilt. But I didn’t like the limited colors and I didn’t like how expensive it was, so I started making my own. Even with that, though, I pinched the tape around the edge and stitched it in place with a zigzag.
That wasn’t the end of my learning process, of course. I could name a number of different turning points in my binding education. These days I’m pretty happy with my process, especially when I hand-stitch to finish.
But I think binding is tricky for many people. I saw a blog post recently from a popular designer and author. She showed how she does corners. Let’s just say the result wasn’t pretty, and I don’t think it was any easier than a basic mitered corner, so I don’t think there was advantage in doing it her way.
Though I’ve posted much of this before, I thought I’d pass on a few tips that I’ve learned over time, which make the process easier for me.
CUTTING THE BINDING
First, how much binding do you need? And how much yardage?
To get all the way around, take quilt (width + length) x 2. For example, if your quilt is 45″ x 60″, you need (45 + 60) x 2 = 210″. Now add 12″ for the corners and the joint. That makes 210 + 12 = 222″.
How much yardage do you need for that? It depends on how WIDE you want your binding. Most references recommend cutting 2.5″ strips selvage to selvage (WOF).
Assume you have 40″ selvage to selvage. If you need 222″, you need 6 cut strips to make the binding. (222/40 = 5.6. Round up to 6.) This is 6 x 40″ = 240″. If you only cut 5 strips, you would have 200″, not enough. Better to have too much than not enough.
(If you’re not cutting selvage to selvage, use the length of strips you’ll actually have. If your strips will be 53″, use 222/53 = 4.19, and round up to 5 strips. I often cut my binding along the selvage instead of edge to edge. It works fine.)
If you cut strips 2.5″ wide, you need 6 strips x 2.5″, or 15″ of fabric. If you’re buying new fabric, buy a half yard (18″). Again, better to have a little too much.
My preference is a narrow, tight binding, so I cut mine at 2.25″. You get to decide your own binding width, which may depend on how you finish it.
If you have leftover binding, save leftover strips in one place. You can piece mismatched binding together to finish scrap quilts with a playful edge, or finish utility quilts and mats without regard to coloring.
ATTACHING THE BINDING
Before I stitch the binding to the quilt, I check that the binding seams do not fall at the quilt’s corners. This prevents extra bulk that makes it hard to get a nice, mitered corner.
If you’re going to do a hand-stitched finish, it’s typical (but not a law!) to attach the binding to the top of the quilt, and do your hand-stitching on the back. If you’re going to machine-finish it, you’ll choose depending on your preferred method for that process.
Increase your stitch length a little. I use a stitch setting of 3. Some people find a walking foot helpful. My machine’s feed dogs work fine and I don’t use the walking foot.
Cut a 45 degree angle on one end of the binding, as shown in the video and in my photos below. Starting at the end you cut at 45 degrees, leave a tail of about 10″ unstitched. Use a 1/4″ seam allowance, or slightly more. Sew with raw edges of binding to raw edges of quilt.
When you miter your corners, most instructions say to stop at EXACTLY 1/4″ from the corner, prior to making your turn. NO. Stop at whatever your seam allowance is. If you’re using a scant 1/4″, use that. If you’re using a fat 1/4″, use that. If you’re worried about getting it right, stitch too far and then back-stitch several stitches. You can check the corner after taking it out from under the needle. If you need to rip a stitch or two, you can do that with no harm.
Continue all the way around, mitering the corners as you go, and stopping with a tail of about 10″ or more.
Now you need to figure out how to join those two ends. My sister sent me this video link from McCalls Quilting, which shows the easy process. It makes a great, smooth joint that is just as invisible as every other joint in your binding.
Here are pictures to show it in more detail. First, I open up the fold on both sides to flatten it completely. That’s why about 10″ of tail on each side works well. With less than that, it’s hard to open it flat. With pinning, the two ends won’t shift and you can mark your line. Use a pencil with a faint line on light-colored fabric. With darker fabrics you can use a faint line of pigma or other permanent pen, or a white marking pencil. Test it first, if you’re concerned the color will show through.

Attach the binding, leaving about 10″ unstitched from each end.

After pinning the binding smoothly and open along the quilt edge, draw a line on the finishing end, using the beginning angle as your template.

Once you have the first line drawn, measure a half inch from it closer to the cut end and draw another line. This is your cut line, and it gives you the extra you need for your seam allowance.
FINISHING THE BINDING
The nicest finish, if you are able, is to turn the binding to the back of the quilt and stitch by hand, using a blind or hemming stitch. Julie at Jaybirds.com has a video to give tips on this. She has a strong preference for using bias binding, which I think isn’t necessary for most of our quilts. But she also reviews how to do corners.
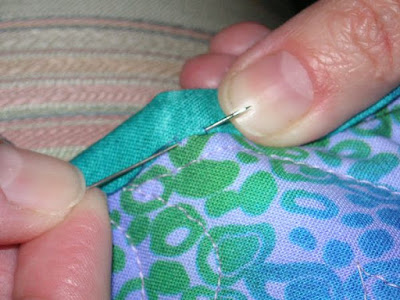
Here is a photo below of me working on binding by hand. You can see the needle travels underneath, so there is only a small stitch on the top. The thread should match the binding color to disappear most completely.
I hope these tips help you make a neat, attractive finish. After all, you’ve put so much time and effort and love into your quilt, it deserves it.

Pingback: Binding A Quilt | jmn
Thanks for the to help. Like so many things, the light will come on and I’ll understand.
I love Wonder Clips to temporarily hold my binding down. They are like tiny clothespins. Being a diabetic, I hate being poked by pins. Also I have a tool that gives me a perfect join at the ends of my binding every time without any math, perfect for the mathematically challenged like me. It’s called appropriately enough “The Binding Tool” and it’s by TQM Products. The Missouri Star Quilt company has a YouTube video available showing how easy it is to use. Sorry I don’t have the link available since I changed computers and haven’t transferred all my bookmarks.
Thanks for posting your method.
I don’t tend to buy notions and gadgets if I can make do without. But it’s always cool to find ones that really work, that we’ll really use. Good for you to find what works for you. Thanks for taking a look.
I’m with you on narrow bindings, though I cut mine to 2 3/8 inches to allow for the crease. I have a drawer full of binding leftovers and occasionally sew a bunch together to make enough to bind small projects. As to binding clips, I like them because I don’t get stuck with a pin point, but also use only about 4 or 5 at a time. As my stitching approaches one I simply move it to the head of the line. I’ve seen people completely pin their binding before hand sewing or use those little clothespin type clips. Yuck. The first method is prickly and the second makes the quilt heavy and is expensive. I often sew my bindings down with a ladder stitch.
I can’t imagine clipping the whole quilt. Farthest I go is sometimes I’ll clip a corner that is “farther” than usual, just because it needs a little extra discipline.
Another thing about leftover binding… I haven’t made a habit of making 1″ inserts into blocks (slice, insert), but leftover binding would be pretty perfect to use for that. WOW I’m tired. Don’t know if that made sense. If not let me know and I can try again. Tomorrow.
I know lots of people love to use clips to hold the binding as they blind stitch it down, but I don’t like them. I have been know to hurl the dratted things at the the wall… My thread catches on them, I knock them off, they slip… Give me pins any day! I like a narrow binding too…
Hi Kate. I actually like binding clips, but I use 3 at a time, all in front of my stitching. (NOT clips all the way around the quilt. What a pain that would be!) I stitch up to one, take it out, stitch up to the next… replace them all farther down.