
There’s a new craze out there promoted by Red Pepper Quilts, crazy mom quilts, and others, and it’s called the economy block. That’s a new term to me, as I know this block as “square-in-a-square” or “diamond-in-a-square.” Maybe the economy comes just in its name!
[See my post of seventeen free designs using this great block.]
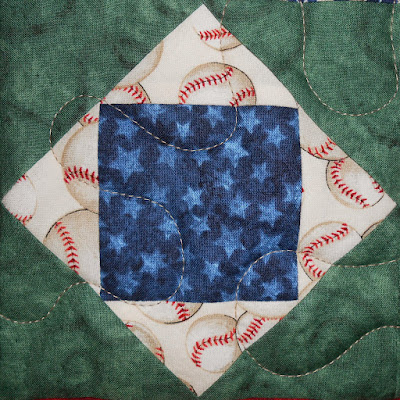
This is the square-in-a-square made with TWO squares in the interior.
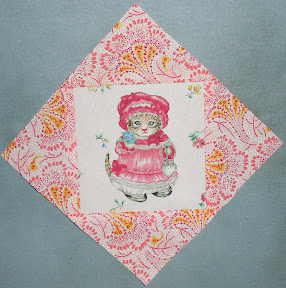
If you’d like to make the version with only ONE square inside, it’s the same as setting a block on point. You might do a large one for a medallion quilt center, or a small one as part of a block quilt or pieced border. See my tutorial here.
I’ve looked at a number of tutorials for the economy block. And none of them explain how to make it any size. That’s okay if you want to make the block their size, but what if their size isn’t right for your quilt? You don’t need to resort to trial and error. This tutorial will show you how to make the right block for your needs.
This trick is key: the whole block will finish at TWICE the size of the center. That’s right. So if the block’s center is 3″, the block will finish at 6″, assuming you use accurate cutting and seam allowances.
That also means that if you know how big the block needs to be, the center is HALF that. For example, if you want a 7.5″ block, your center will finish at 3.75″.
Simple, huh?
How does this work? Math. But nothing scary. Bookmark my blog and you’ll be able to find this any time under the Tutorials tab.
Start with the size of the finished block you want.
finished block size/2 = finished center
example: 7″/2 = 3.5″
finished center + 0.5″ = cut size of center
ex: 3.5″ + 0.5″ = 4″
CUT one center 4″
See note below about fussy-cutting the center.
(finished center/1.414) + 0.875 = size of square to make TWO corners
This assumes PERFECTION. I do NOT assume perfection! Round up at least a half inch.
ex: 3.5/1.414 + 0.875 = 2.475 + 0.875 = 3.350, or about 3 3/8″.
Now round up to 4″.
CUT two squares 4″. [Note: this is a coincidence! You won’t always cut them the same size as the center patch.] Cut two because you need four corners.
CUT each square in half on the diagonal.

Here is the center patch surrounded by its first (interior) triangles. Note they extend well past the edges of the center. (Isn’t she sweet?)
CENTER the long edge of a triangle on the square’s edge.
SEW using a 1/4″ seam allowance.
REPEAT with the opposite side.
PRESS toward the triangles.
TRIM the overhang even with the square’s edge.
REPEAT with the other two triangles.


All 4 triangles sewn on, but before trimming.
LINE UP your ruler so the center corners point straight north, south, east, and west.
TRIM the edges to new 1/4″ seam allowances.
Trimmed. The distance from the center patch corner to the edge is 1/4″.
Now, REPEAT the process for the next set of triangles. It’s slightly different, though. Pay attention.
finished center + 0.875 = size of square to make TWO corners
Round up at least a half inch.
ex: 3.5 + .0875 = 4.375″.
Now round up to 5″.
CUT two squares 5″. Cut two because you need four corners.
CUT each square in half on the diagonal.
CENTER the long edge of a triangle on the square’s edge.
SEW using a 1/4″ seam allowance.
REPEAT with the opposite side.
PRESS toward the triangles.
TRIM the overhang even with the square’s edge.
REPEAT with the other two triangles.
LINE UP your ruler so the center corners point straight north, south, east, and west.
TRIM the edges to new 1/4″ seam allowances. If your cuts and seams are accurate, you should have a block that finishes the size you want. How’d you do?

This block measures 7″ finished! Just as I wanted.
The math above will allow you to make your block any size. If you want a cheat sheet, this shows the finished block size, with cutting sizes for the center patch and the two sets of setting triangles.
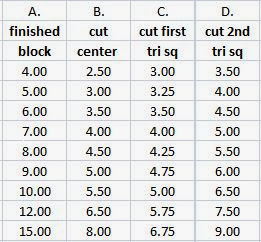
A. size of your finished block
B. size to cut your center patch
C. size to cut two interior squares; sub-cut each square on the diagonal
D. size to cut two exterior squares; sub-cut each square on the diagonal
The dimensions for C and D are oversized to allow for imperfection. You will still need to trim after these steps.
Fussy cutting note: if you fussy cut your block center, cut it “square” to the design, not on the diagonal. You may have bias edges with this. If so, consider starching before cutting to stabilize the fabric for both cutting and sewing.
One more note: while in most of my piecing I prefer to use exact measures and accurate seam allowances, in this I prefer to oversize and then trim down. My results are better, and for me that’s the bottom line.

I wanted to build a table topper using repeated block in a box. Thank you for belong me with the math.
Helping, not; belong
Noted another instance (just delete this comment)..so all .0875 s/b .875
Why this instructions don’t work. I tried two different sizes and still is wrong.
The inner triangles are way to small and the outer triangles they don’t reach the needed sizes so there’s no way to give that 1/4 inch needed. Are your sizes confirmed?all the corners are open. I can send you a picture if you want. I was trying the big size blocks.
you put so much work into this post, I’m sure your eye read this accurately
“ex: 3.5/1.414 + .0875 = 2.475 + 0.875 = 3.350, or about 3 3/8″.
The first .0875 s/b .875
Thank you for this tutorial. I just discovered this block and love it!
Absolutely love the Square in a Square Cheat Sheet and tutorial! Worked perfectly for my quilt pattern! Thanks for doing all the hard work!
I know this is an older post, but thanks all the same! I just finished my first set of blocks, varying sizes, and they’re adorable and came together smoothly (maybe not quickly, but that’s ok!) I’m going to work then into a crib quilt for my daughter due in August 🙂 Such a neat way to highlight special fabric.
Thank-you!! Just what I was looking for. After messing with these blocks for 2 days everything finally started to click. I definitely am a hands on learner! I loved the rest of your blog too. We did a similar Santa Fe trip early March before the virus heated up. I’d love to go back. We live in Indiana, my husband grew up in Galesburg, IL and my father’s side of the family is all from State Center, IA, so I can relate to your midwestern stories. Thanks for taking the time to post, you sure helped me understand the math behind this block.
Pingback: Economy and Rough Drafts | OccasionalPiece--Quilt!
Thank you! My husband was trying to explain the math to me at no avail. We were both thrilled to find your post! He knew he was right!
I know this was posted quite some time ago, but how would I adjust the cheat sheet if I needed a 7.5″ block ? Love the photos. I am going to make a baby quilt and have been looking for awhile for a modern pattern that accommodates fussy cutting. , After reading this and other blogs I decided the best thing to do is make the economy blocks and create my own. As I experiment on paper it appears I may need 7.5″ blocks (finished size) that is why I am asking. thanks for your help.
Still useful after all these years!
Thank you so much! I have fallen in love with the Storm at Sea quilt and I bought the rulers to make the diamonds but I was afraid I would have to buy another set to get the squares. I am very grateful for your instructions.
You’re welcome. Have fun with the Storm at Sea. They always turn out spectacular.
Thank you so much for this explanation and chart, certainly a huge help.
oi. sou brasileira e escrevo em portugues! hoje é domingo e passei o dia estudando tecnicas do patchwork porque decidi me lançar nele com força. achei muitos blogs e instagrans muito bons. mas os seus cálculos sobre os quadrados foram de grande alegria prá mim. não adianta reguas e tal se não sabemos cortar os quadrados e triangulos. OBRIGADA A LOT.!!!
Olá. Obrigado por ler e comentar. Existem muitas boas fontes. Espero que você goste!
Does your finished block size chart include seam allowance? E.g finished size 7″ block is really 7.5″ ?
Yes, Emily. The term “finished” always means the dimension within the seams, so finished size of 7″ means that the unfinished sized — prior to being sewn into something else — is 7.5″.
Same question as Emily. When you say “finished block size” Such as a 7″ finished block. Does it measure 7.5″ so when it truly finished into a quilt it is 7″,
The finished size is half inch less because it does not include the 1/4″ seam allowance. The unfinished size INCLUDES seam allowances. You should always read it that way.
THANK YOU SOOO MUCH!! This helps me tremendously as I’ve only been quilting a year to carry on my Granmas legacy and wanted to learn how to create this block. Your instructions are clear and concise.
I’m so glad it could help! Enjoy the process. Remember you are still a toddler at this, so be patient with yourself as you learn the skills. 🙂
Hello Melanie! It’s been years since you’ve responded to comments on this post, so I’m not even sure if I’m talking to anyone right now— fingers crossed, I guess! I have a question about your fantastic quilty math: where did you get the 1.414 that’s in the formula for figuring out the size of the squares used to make the first set of corners? (That was wordy but unavoidable. Sorry!) I’m a big fan of all kinds of math, so I’m terribly curious. Also, knowing the how/why of each step makes the process easier for me. Sooo, I hope the Quilty Gods smile upon me and see that this message gets to you! In the meantime, I’m gonna try to figure out the 1.414 mystery for myself.
I love questions like this, so thanks for asking! Here is a post I wrote on the math. Hopefully it can answer your question. https://catbirdquilts.wordpress.com/2016/04/01/math-is-awesome/
Thanks for reading and commenting. Hope to see you again.
My apologies if this posts twice ….
I saved all my fabric leftover from shirts I made while putting myself thru college. I’d also saved all the legs of my jeans when they were turned into shorts each summer. So in 1985 I found myself with a box of fabric consisting of denim, and various scraps of prints and solids and a chunk of solid white (because I hadn’t gotten a job in my field yet and thought I’d need another white uniform or 2 for my waitress job) and I decided to make a quilt. After all, my grandmother turned all her sewing scraps into quilts. While I didn’t pay much attention to her sewing, I knew enough to cut pieces of cardboard to trace around. It’s ok to laugh, I’m grinning as I type 😉
That first quilt started with two solid triangles sewn into a square, then 4 print triangles sewn on each side of that square. Lastly, 4 bigger triangles of denim sewn around. The backing was that unused white fabric.
It wasn’t until much later in my quilting life that I learned that I’d actually made a square in a square in a square as my first quilt.
My first quilt was much less ambitious than yours, so I’m quite impressed! I’ve heard of people believing they invented 9-patches, so I think you did just fine. Thanks much for reading and commenting.
I know it is greedy, but I am asking – what is the math for one more round (so that the center square is on point again?) I have an antique quilt with that setting that I would like to copy. Thank you for your time and trouble.
To make one more round, the math goes back to the beginning. As above:
(finished center/1.414) + 0.875 = size of square to make TWO corners
This assumes PERFECTION. I do NOT assume perfection! Round up at least a half inch.
ex: 3.5/1.414 + .0875 = 2.475 + 0.875 = 3.350, or about 3 3/8″.
Now round up to 4″.
CUT two squares 4″. [Note: this is a coincidence! You won’t always cut them the same size as the center patch.] Cut two because you need four corners.
CUT each square in half on the diagonal.
Here your finished center is what you have after you’ve added corners twice already. For example, if you have put corners on twice and now the finished size (the measure not including seam allowances) is 8.5″, you’ll use that in the formula above. It would be (8.5/1.414) + .0875 = 6.89″. Round up to 7″ (or more) to get the squares for your new and final corners.
If you want to copy the size of blocks in the antique quilt, begin with the finished block size. The little center in it should be about the same size you get from a calculation. Use the
(finished block size/2.828) = finished center size. So if the finished block is 10″, you would have 10/2.828 = 3.54″, or about 3.5″. It would be easiest to round to that, of course.
Here is how that would work:
3.5 x 1.414 = 4.95″ — that would be the finished size after 1 set of corners
4.95 x 1.414 = 7″ — the finished size after 2 sets of corners, and double the center as predicted
7 x 1.414 = 9.9″ — the finished size after your 3rd set of corners. It is less than 10″ because of rounding down to 3.5″ in this example. But remember you will use oversized corners in my method and then trim, so you can trim to finish at 10″ and have only a tiny bit of float.
I hope this helps.
I was wondering why the second round math was different, thank you for explaining! I also love that you continue to monitor comments long after publication! 🙂
I’m still here! Glad you found it and got some good from it. Let me know if you have questions.
I do have a question. I made a few blocks with a different method before I found this post. When I compare the finished size of the center block to the measurements/math here, I get very different results.
The first method is cutting the center patch the size of the full block, the cutting four squares to snowball each corner. That method used a lot of my precious center patch fabric, but it did work. However, the center patch was larger than what your math shows.
I must be missing something. Help!
I don’t really know, Louise. Did the first method put on 2 sets of corners, or just 1? With 2 sets they should end up the same or at least very similar.
Melanie,
The first pic is the original method, starting with a 4.5â square of center fabric, and four 2.5 squares sewn diagonally to âsnowballâ the corners.
I used the economy method (to the best of my understanding) to reconstruct the same patch for a 4â finished square.
Goal is a 4â finished square in a square block. 4â / 2 = 2â. Add 0.5â = 2.5â center block.
As compared to the original snowball method, the center is nearly 3â.
Maybe I did some math wrong somewhere along the way or did not quite grasp the process. While my project is moving forward anyway, I do want to have the method in my âtoolboxâ so that I can use it in the future, as it uses less fabric and eliminates the need for trimming every snowballed corner.
Thank you so much for engaging with me on this and for producing such an informative blog!
Louise Duffy 823 NW 60th Street Vancouver, WA 98663
Mobile 251-786-0289 louise.d.duffy@gmail.com
Thanks so much! I’m making a quilt with blocks (flying kites) that come out as they will. I need a second block and couldn’t make the square in a square come out the right size. Now I can!
You’re very welcome. I’m glad this will help.
Pingback: Happy Flower QAL - Blocks 1 - 4 - Arabesque Scissors
I like your site, good and informative.
Thanks so much!
Pingback: I’ve moved on! – Alice Samuel's Quilt Co.
thank-you for this tutorial Melanie. It really helped me to make some pillow tops recently. I hope it is ok that I linked back to you.
Colleen
Absolutely. Thanks for the link. The pillows are very pretty, and I’m glad you found the tutorial helpful.
Pingback: Stars on Point | PieceMakerQuilts
Thank you. For the cheat sheet and patterns. We just celebrated our 50th wedding anniversary and our children had our family and guests decorate a 6inch square, for me to incorporate into a pattern. I was thinking of a coffee table type book, or wall hanging. I have 39 squares and want to center each square, but have a few different designs.. I was Google ing and found your site. This seems perfect. Thank you so much for sharing marywallis
You’re welcome, Marywallis. That’s a great idea to use them for signature blocks. Happy anniversary!
Pingback: Tuesday Tips–6/30/2015 | QuiltMouse
Thank you so much for explaining this! I have been trying to make a square in square block with six layers, but the pattern doesn’t say how big my piece should be after each layer, only the finished size! so no matter how carefully I would piece it, it came out wrong. I have to square up after each round of triangles, now I know how it should work.
I hope this works for you. Let me know if you have questions. The main thing is, the inside square has to be half the finished size of the ending square. So if you’re doubling up on that, the very innermost square will be a quarter the finished size…
I’ve never heard it called an ‘economy block’. Thanks for the tutorial/chart. I will be sharing a link back to this post on my Tuesday Tips post next week!
You’re welcome!
Hi! Melanie
First thank you for reading and liking a post on my blog! Much appreciated. I love the medallion quilt on the bench at the top of the page – no doubt you can do math if you can create a quilt like that. And this tutorial is just great ‘cos I have a real block with math – I can follow a formula but could never devise one. I’m going to share this method on Facebook.
With best wishes
Allison, UK
I’m so glad it can help, Allison. The math is easy for me. And yes, if you look around my site, I’ve designed and made a lot of medallion quilts, almost all of them in a mathy way!
Thanks for sharing the tutorial. It is my MOST viewed post, by far.
Pingback: Blue Christmas Finish | Evening in the Garden Quilts
Pingback: September Block for that DAM Quilt Along – SUNSHINE BLOCK |
Thanks Melanie – very useful for the maths which I am hopeless at! I think I would like to do something similar in all solids to see how it goes.
You’re welcome. All solids would look great. Have a good time!
Reblogged this on Cuenca Quilt Guilt and commented:
A really helpful tutorial!
Pingback: #DYOSampler Quilt Along: Picking Blocks | Mouse in my Pocket
Pingback: On The Go Quilting » Friday Finds, March 28
Thanks for the link!
This makes it so easy for the math challenged. I’m with you–oversize is better and trimming for accuracy is better than too small!!
This is the kind of challenge I like — watch the gears turn! 😉 But I know it’s very uncomfortable for some people. Glad to help.
Another grateful quilter chiming in to say Thank you!
You’re welcome! I hope it will help!
This is a favorite kind of posting – love that you’ve done the math for us! Thanks :*)
Thank you and good morning!
This is a weird coincidence: this song was playing in my head BEFORE clicking in to your latest post http://www.youtube.com/watch?v=0IeckXmVBQI
Thanks, this is super helpful!
You’re welcome!
Thanks for another great quilting tip, Melanie!! Thanks for posting this in stashbusters too!!
You’re welcome. 🙂
Thank you for the clear concise steps! Also, I love your quote, “I do NOT assume perfection!” That’s definitely my quilting philosophy!
I like perfection, and frankly, I’m pretty good. But I’ve tried this too many times that way and had bad results. It’s just easier to go BIG, and then trim!
Thanks for reading and commenting.
I just meant that I think teachers are more effective when they accept that their students may have a wide range of standards for their own work, to put it nicely. By thinking of how to get the lesson through to people at all different levels, you make it easier to follow. Whereas if you were saying “nothing less than perfection will do here”, it might intimidate people rather than make them want to try it.
Oh, yes, that too! Thanks for clarifying. 🙂
Thank you so much for sharing this wonderful tutorial with us. It’s simple, easy to follow and it works! I was struggling with this very same block and this solves my sizing problems. I so appreciate your time and expertise.
You’re welcome, Penny. I hope it helps.
Great tutorial! It looks all very simple now :-). The inner two blocks remind me of the dear jane block, i think it is D 13, that is used in a Siggy Swap, i am partcipating in. This will help certainly! Thank you!
Liset
You’re welcome! Have fun.
Thanks for being the math whiz here! Something I am not…
Maybe no math whiz, but you inspired me to look into these. Thanks!
oh my gosh!!!! thank you!!!! some of my friends are really into the square in a square ruler method. too much waste for me! you are a sweetie for sharing!!! whew! so super simple…..
Hi Lorene. YES! It is simple! It is a lot of steps with trimming and pressing, but all of the steps are easy. And it makes an impressive looking block. You’re very welcome!
I love this! You are so right that trying to downsize patterns on other websites is frustrating. Thank you so much for this and for the chart.